|
|
|
|
 30-07-2011, 03:37 PM
|
#1 |
|
Senior Member
 
Join Date: Oct 2009
Location: NSW
Car: 1998 Toyota Supra 3.0L Twin Turbo
Posts: 1,413
|
HOW TO: BA Dash Removal
Click images to see bigger version What you will need: A Standard Sized Phillips Head Screwdriver The same screwdriver but a short stubby one (index finger length) A Flathead screwdriver Method: 1. Slide driver and passenger seat the whole way forward. Hop into the back seat and use the phillipshead screwdriver to undo the 2 screws (1 each side) of the centre console bin. 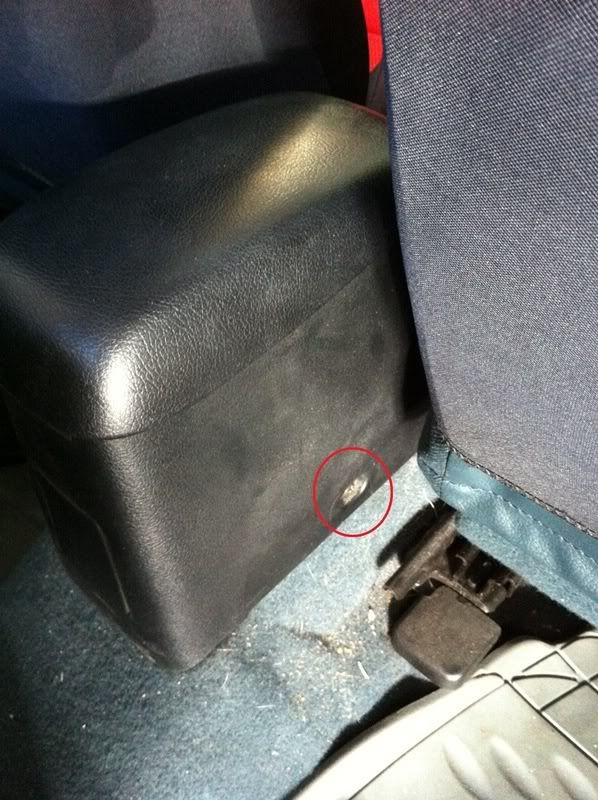 2. Slide driver and passenger seat all the way back. Slip your fingers under each side of the centre console and pull outwards and upwards, you'll feel 2 pop studs give way. Lift console over the handbrake lever and place aside. 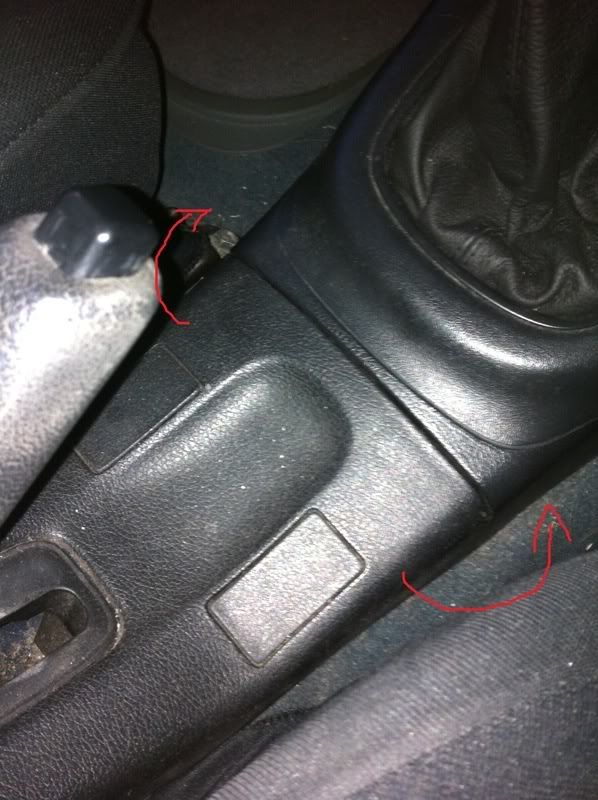 3. Undo the two screws you just revealed. Also unscrew the gear knob from the gear stick. It spins for a very long time. 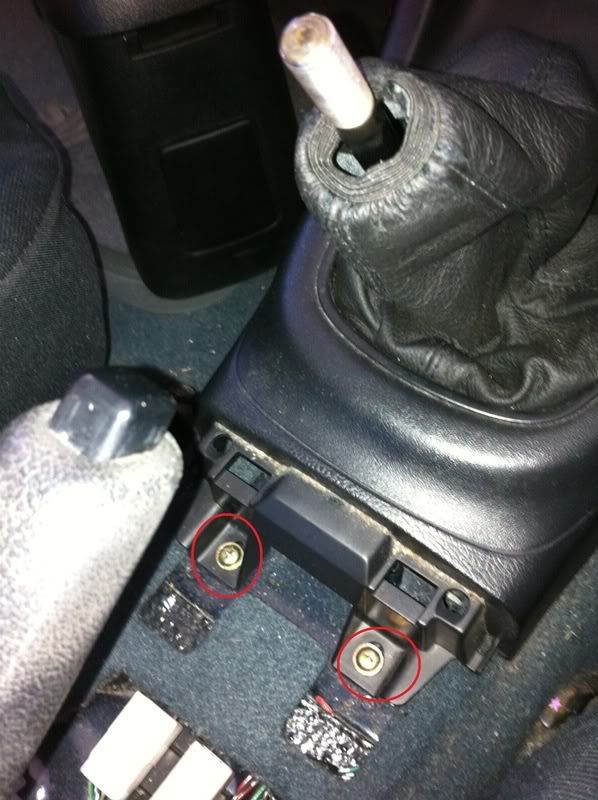 4. In each footwell (driver and passenger) is a small pop stud against the centre console, remove both of these. 5. Grip the Centre lower console as shown (2 hands, one had to take a photo  ) and give a sharp yank towards you. It should come free, you're only fighting 2 pop studs here (marked in red). ) and give a sharp yank towards you. It should come free, you're only fighting 2 pop studs here (marked in red).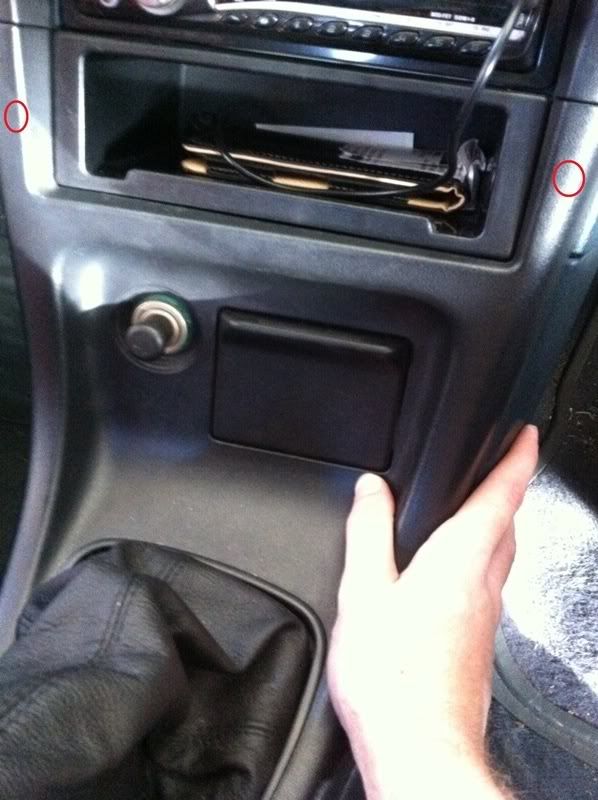 6. Reach down into the gap behind the piece you just dislodged and unplug the cigarette lighter and ashtray wires. Now proceed to remove this piece. It's a bit of a jiggle but angle it right and it'll come out. PROTIP: Place the car into 2nd, 4th, Reverse, or this piece will never come free (Thanks 7ONYD) 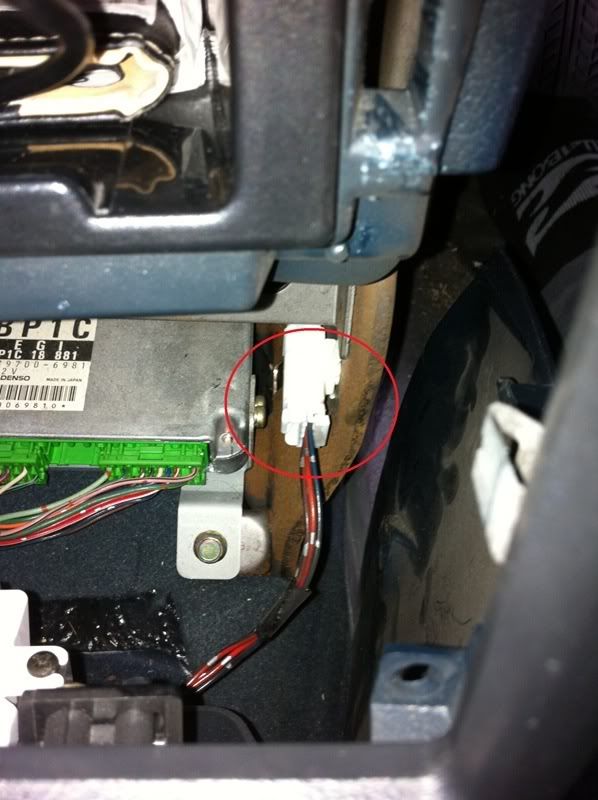 7. Go to the drivers side of the dash, and on the right hand side between the dash and the door, is a small triangular..ish... panel. Stick a flathead screwdriver in and lever it out. There are quite a few pop studs here, work your way around the edges and negotiate them out. Red ones are pop studs, green are more, hinges. Toss this bit aside.  8. Undo the 2 screws that were under this panel. 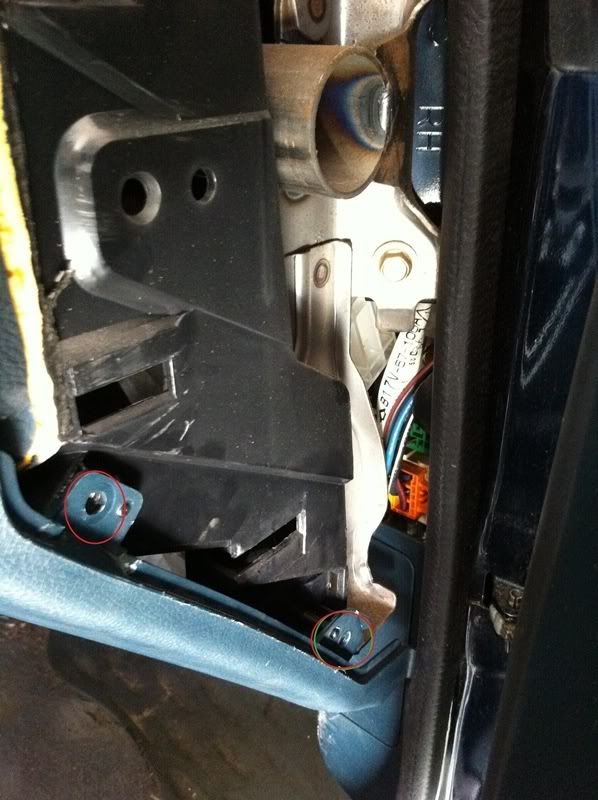 9. i ALWAYS forget to take this combo stud out and always wonder why the next piece wont move. Open the cubbyhole/sunnies hole, and at the top of it is a small black phillips head screw. This is where the tiny screw driver comes in handy. I'm sure you can remove the cubby box thing but i can never manage to. Undo this screw for a while (maybe 1cm) then pull it out. It's a cross between a screw and a pop stud. 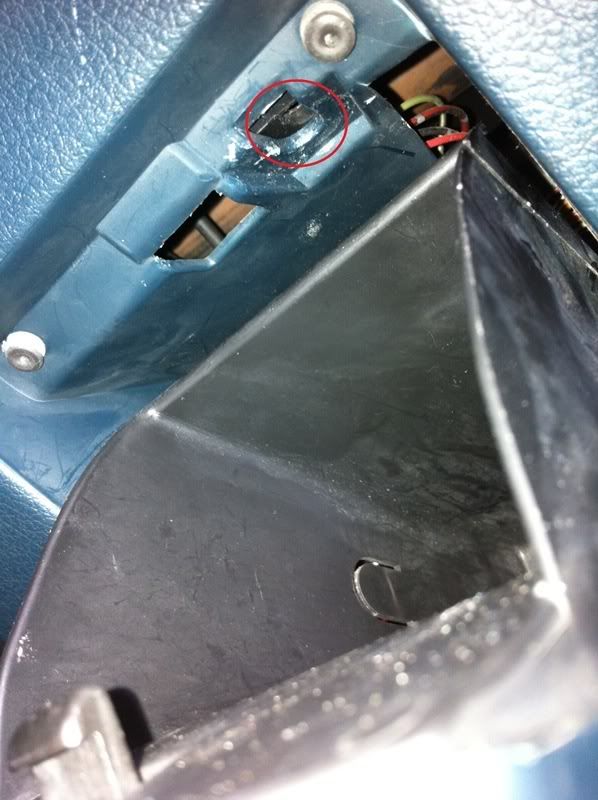 10. Pull gently from the bottom of the drivers kick panel down and towards you. It should all come free. There's a few pop studs to free up.  11. Either side of the steering wheel is a screw, undo these. 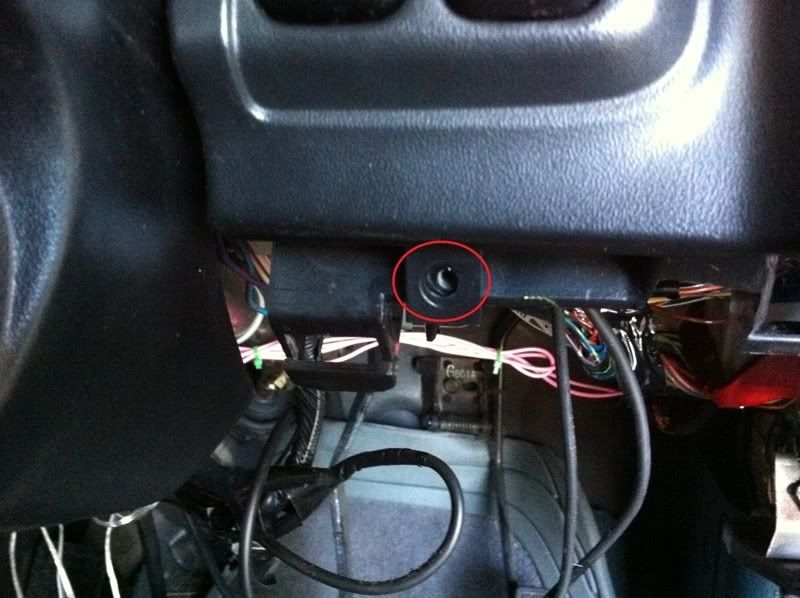 12. LOWER STEERING COLUMN TO LOWEST POSITION (important or you'll kill yourself trying to figure out why the top bit wont come off) 13. Grab the top of the dash firmly and pull sharply towards you. Usually this section comes free but the left hand side will be stuck. Work your fingers around the edge and release it. There are 9 pop studs marked in red. DO NOT PULL TOO FAR, as there are cables which must be unplugged. 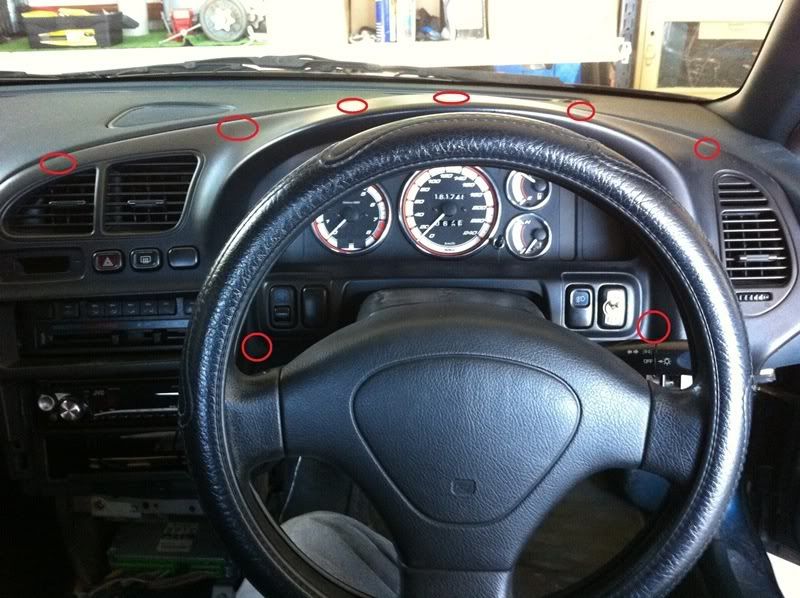 14. Reach behind on the right hand side and unplug (depending on what you have), Rear Foglights, , Front Foglights, Headlight Leveller, Dimmer Switch. On the left hand side unplug (depending on what you have), Clock, Hazard, Demister, Headlight Washers. The top dash piece can now be jiggled free.  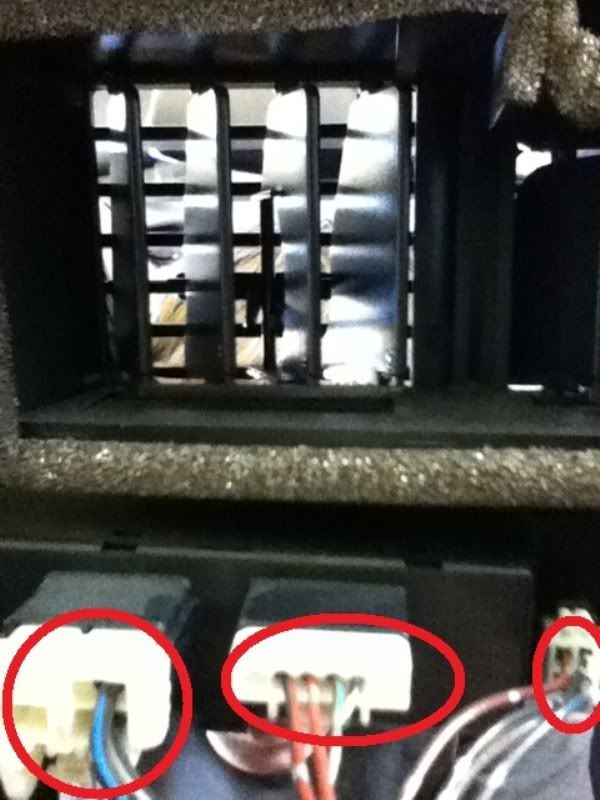 15. To remove the gauge cluster there are 4 screws, undo these (marked in red). There are some alignment pins on the left and right which you will notice (marked in green). Make sure when reinstalling that these go in. Pull the cluster slowly forward NOT TOO FAR. There are 3 cables that need to be unplugged, look behind it and release these. Then the cluster is free to be removed.  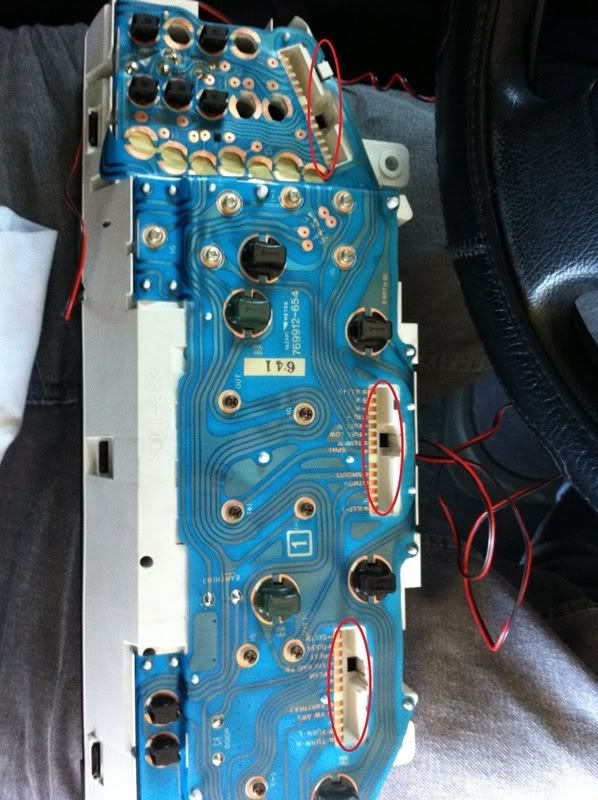 16. To take off the clear plastic on the front, There are several plastic tabs around the edges, pop these out and then remove (marked in red). Try to remove it straight as these tabs are easy to snap. If you wish to remove the black gauge surround to access the actual gauge faces, Repeat 16 but instead remove the black tabs (marked in green). 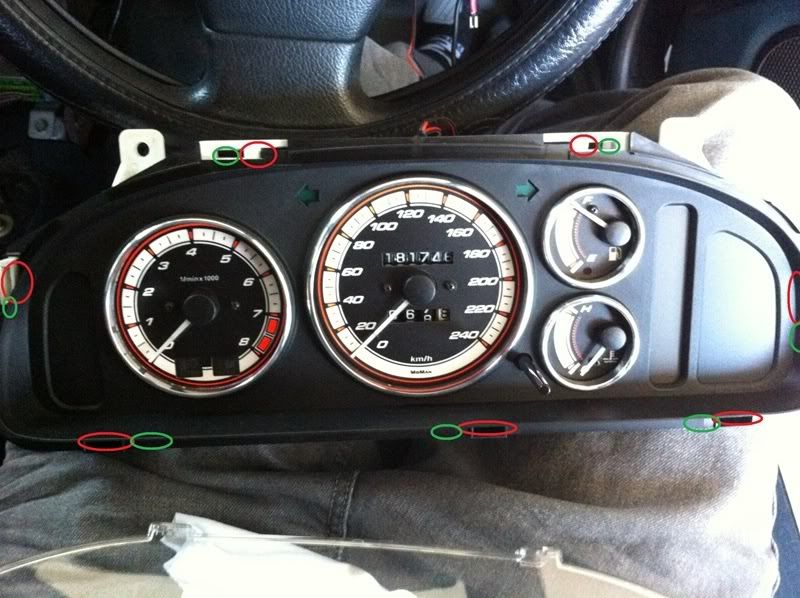 Reinstallation is the reverse. 
__________________
 1996 Mazda 323 Astina BA Hatch 1.8L - No Longer Mine 
Last edited by mikey_something; 27-01-2012 at 10:48 AM. |

|

|
| Sponsored Links |
|
|
|
30-07-2011, 04:22 PM
|
#2 |
|
Veni, vidi, vici

Join Date: Mar 2008
Location: Brisbane
Car: 1996 BA Hatch & 2005 RX8
Posts: 4,911
|
v nice
__________________
 |
|
|
|
|
30-07-2011, 04:38 PM
|
#3 |
|
Junior Member

Join Date: Feb 2011
Location: hornsby
Car: Toyota cressida mx73
Posts: 199
|
Awesome walkthrough, may need this!
Btw what dials do you have? |
|
|
|
|
30-07-2011, 05:05 PM
|
#4 | |
|
Senior Member
Join Date: Oct 2009
Location: NSW
Car: 1998 Toyota Supra 3.0L Twin Turbo
Posts: 1,413
|
Quote:
Those are the dials, bit expensive. i also have chrome gauge rings.
__________________
1996 Mazda 323 Astina BA Hatch 1.8L - No Longer Mine
Last edited by mikey_something; 30-07-2011 at 05:08 PM. Reason: added an english link |
|
|
|
|
|
31-07-2011, 09:48 AM
|
#6 |
|
Senior Member

Join Date: Sep 2004
Location: n/a
Car: n/a
Posts: 10,929
|
nice right up. will come in handy very soon. need to remove the dash surround for gauge wiring. thanks.
|
|
|
|
|
31-07-2011, 01:25 PM
|
#7 | |
|
Senior Member
Join Date: Oct 2009
Location: NSW
Car: 1998 Toyota Supra 3.0L Twin Turbo
Posts: 1,413
|
Quote:
EDIT: rehosting files as they got lost somewhere, changed them to thumbnails which link to bigger images for loading speed purposes.
__________________
1996 Mazda 323 Astina BA Hatch 1.8L - No Longer Mine
Last edited by mikey_something; 27-01-2012 at 10:47 AM. |
|
|
|
|
|
20-05-2012, 03:04 PM
|
#8 |
|
Junior Member

|
Hey mate, great tut, most of the steps are the same for mine but I have an auto, how do you remove the auto shifter top/buttons etc? it's the only thing that I can't figure out lol, there's two screws on the front of it but there must be some trick to taking it off after they're off?
__________________
One Astina ad I remember the most had in it's description: "Has never been driven by P platers" - Harsh! lol |
|
|
|
 |
|
|


 Hybrid Mode
