|
|
 24-10-2009, 07:28 PM
|
#1 |
|
2-Wheeled Weirdo
 
|
HOW TO: Installing suspension on your BG/KF Laser.
Points covered with this thread.
1. Shocks and springs 2. Strut mounts 3. Ball Joints ************************************************** ******* Shocks and Springs; The first major point to stress here is SAFETY FIRST, have a big flat area to work on, the proper tools to do the job and someone to help you out. Lift with your legs, not your back, and please, wear gloves and eye protection, you never know what will happen. Minimum tools required: * GOOD quality 1/2 inch socket set (you will break smaller ones quite easy) * Car stands (2 minimum) and car jackets (2 preferred) * Assortment of rubber mallets or some hammers and bits of wood. * Spring compressing tools and these of course  How to do it: 1. Crack your wheel nuts and put the car up on the stands, at least the front end. While its up, finish unscrewing the wheel nuts and remove them. Place your wheels under the midsection or engine of the car as a backup incase the car drops off the stands.  2. Crack all of these bolts/nuts but DON'T undo them yet. *all 4 nuts that attach the suspension strut mount to the body (from your engine bay) * The two main bolts that connect the bottom of the strut to the actual hub/knuckle while you are here, unclip your brake line from the little retaining hoop. 3. You are ready for some bigger stuff now? good. take out the 2 major bolts from the bottom of the strut, which will allow you to lower the whole brake/hub assembly downwards a bit, don't lower it too much or you will over-extend your CV joints. best to prop them up with something for now. 4. Unbolt all of the nuts from the suspension top mount inside your engine bay while somebody holds onto the strut from underneath. If you drop the whole strut it will hit directly onto the hub/CV, not something you really want to do. ok, now just slowly bring it out through the wheel well and place it on the ground. KEEP THE TOP AND BOTTOM OF THE STRUT AWAY FROM HUMANS OR ANIMALS Congrats, you just got one strut out. now what? ill just explain it on one strut and you can repeat for the others.  ================================================== ======= Strut Disassembly; 1. connect your spring compressors either side of the spring, equal positioning and pressure is key here to save your body from being injured. SLOWLY and evenly compress the spring, 1-2 turns on each compressor until the spring has no pressure placed onto the top-hat. 2. Get your trusty sockets out again and take off the retaining nut thats in the centre of the strut top-mount. remove this, and TA-DA you can now remove your top-hat and the spring. once again PLACE THE SPRING SAFETLY ON THE GROUND, WITH BOTH ENDS IN A SAFE DIRECTION Strut Assembly; 1. compress your new springs as above, or take the old springs if your re-using them and place them into the new strut, there will be a little notch at the base where the END of the spring will sit, and stop it from rotating. place it there  2. keep the spring compressed, put the top hat back on, and your strut top-mount. replace the centre nut with your fingers to prevent cross-threading (thus destroying your lovely new shockies) once its fairly tight, you can use your torque wrench or socket set (CAREFULLY don't overtighten). 3. SLOWLY and evenly take off the spring compressors. SHAZAM! you now have a complete strut unit. fantastic. A complete strut  This shows clearly the TWO big main bolts at the bottom of the strut.  ================================================== ======= TIP: you can use a piece of wire and tie your hub to the top mounting point of the strut so you don't have to prop it up. ================================================== ======= Replace your struts as per removal, but in reverse obviously. ************************************************** ******* Strut mounts; These are really important now that our cars are reaching the 20 year mark. They are lovely little piece of rubber and metal, these flex and support your shocks, so good condition is key. Also as I've experienced on both my KF laser and BG, they fracture or snap VERY easy now that the rubber is a bit old, especially with new suspension. the $450 is a big price, but its worth it. get some. just put them on instead of your old strut top-mounts when in the reassemble stage of your struts. Look like this? replace it  Should look like these!  ************************************************** ******** Ball joints; These are tricky little buggers but easily in the realm of everyday mechanics. best to buy a manual or look on fordlaser.com for the tutorial. however there is a few hints I will give with these. * Soak the whole area in WD-40 overnight to help with undoing the bolts/nuts * Make sure the main connecting bolt thats on the arm of the balljoint is ALREADY pressed into the metal. one of mine was not, and it takes ALOT of machine force to press those in. * Use a rubber mallet and a big fat screwdriver/bolt to tap and manhandle the balljoint into place when your trying to re-fit the pinch bolt that holds it in. these are an EXTREMELY tight fit and tend to ruin your day. gently tap the base of the balljoint with the rubber mallet while you wiggle your bolt into place. The silvery thing is my new balljoint installed, just showing so you can see the location.  ************************************************** ******** There it is! the first time I did this on the BG it took me 4 hours for the right side and 2.5 for the left. that included the balljoints and swaybar bushes. remember to make sure everything is tight, then check it again... twice! take your car out for a test run around the local streets, come back and check everything is still together. 100km later, recheck all the bolts and nuts again. Enjoy! i've probably forgotten one or two things I wanted to say here but I will update it in the future. Chris.  |

|

|
| Sponsored Links |
|
|
|
26-10-2009, 11:00 PM
|
#2 |
|
Junior Member

Join Date: Jun 2008
Location: Sydney
Car: BG Astina
Posts: 228
|
*Thumbs up*
This should be made a sticky. |
|
|
|
|
27-10-2009, 06:01 PM
|
#3 |
|
Junior Member
Join Date: Jan 2008
Location: S/E Suburbs
Car: 1991 TX3 KF
Posts: 83
|
Another tip is to cable tie/use wire to support the brake calipers, don't want to stretch the abs lines/fluid hoses.
Also a ball joint seperator is very handy, doesn't cost too much +1 for this being stickied |
|
|
|
|
27-10-2009, 08:28 PM
|
#4 |
|
Senior Member

Join Date: Dec 2006
Location: North Side Brisbane
Car: 1998 BA 323 Astina Hardtop
Posts: 1,414
|
Also, correct me if I'm wrong, but I think this is pretty much the same for the BA as well.
|
|
|
|
|
28-10-2009, 06:23 AM
|
#5 |
|
2-Wheeled Weirdo
|
yes! the balljoint forks are very hand. we had to deal with a big screwdriver and mallet.
|
|
|
|
|
29-10-2009, 12:57 PM
|
#6 |
|
Junior Member

Join Date: Mar 2005
Location: Central Coast
Car: KH Turbo Laser
Posts: 201
|
For the People that have old strut tops,
This is what can happen if you leave them creaking for too long if they are creaking / you can see some small cracks Don't put it off! try and source some others asap mine were creaking for 2 weeks, I had the strut ready to go in, I just didn't get around to actually changing it Check it! Normal Strut - 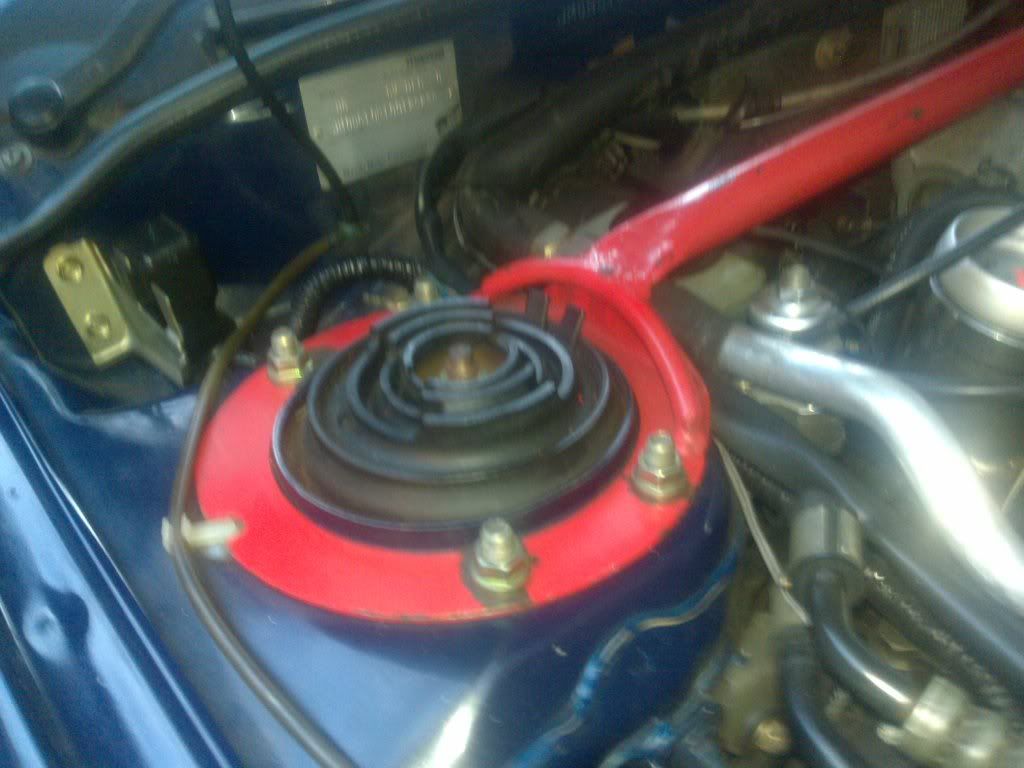 Strut top goes BANG! 
|
|
|
|
|
30-10-2009, 05:09 PM
|
#7 |
|
2-Wheeled Weirdo
|
YEP! I had that done as my suspension was settling in my KF laser after I changed the tyres, and in the BG astina after putting pedders springs in.
|
|
|
|
|
30-10-2009, 05:17 PM
|
#8 | |
|
Senior Member

Join Date: Sep 2004
Location: n/a
Car: n/a
Posts: 10,929
|
Quote:
|
|
|
|
|
|
30-10-2009, 11:38 PM
|
#9 |
|
2-Wheeled Weirdo
|
sticky
?edit: ZOMFG! 555th post... now i just need 111 more to go. |
|
|
|
|
30-10-2009, 11:40 PM
|
#10 |
|
2-Wheeled Weirdo
|
disregard, already stickied :P
|
|
|
|
|
24-09-2010, 06:24 PM
|
#11 |
|
Junior Member
Join Date: Jan 2008
Location: S/E Suburbs
Car: 1991 TX3 KF
Posts: 83
|
I'm about to do my rear struts
However I'm having trouble finding the strut top mounts, dust boots and rubber spring seats. Does anyone know where to source them other than Mazda/Ford? |
|
|
|
 |
|
|


 Linear Mode

