|
|
 12-01-2010, 08:00 AM
|
#21 |
|
AstinaGT Regular

|
Orion...
Nice ride you have there... big fan of the black / smoke headlights |

|

|
|
12-01-2010, 02:30 PM
|
#22 |
|
Senior Member
Join Date: Jun 2008
Location: Auchenflower, Brisbane
Car: Blue SP20
Posts: 2,782
|
I find it interesting that with all the other stuff done to the car you have stock intake. Theres certainly nothing wrong with it, just interesting or curious you could say. *shrugs*
__________________
 |
|
|
|
|
12-01-2010, 02:37 PM
|
#23 |
|
Moderator

Join Date: Oct 2005
Location: Ipswich, Queensland
Car: 2002 Mazda Astina SP20 2006 Mazda 6 GY Wagon
Posts: 9,769
|
Orion's got an K&N CAI going on soonish Kris

__________________
 ![[URL="http://www.astinagt.com/forums/vbpicgallery.php?do=view&g=590"]](image.php?u=1216&type=sigpic&dateline=1355019352) |
|
|
|
|
12-01-2010, 03:01 PM
|
#24 | ||
|
SP20 Member!
 
|
Quote:
Quote:
The major thing stopping me putting that on is the fact that it will need to go on at the same time as the 626 intake manifold that I also have sitting around. I want to put them on at the same time, because the Microtech will need to be re-tuned - might as well combine the two and pay for only one tune  Although, with access to a few more tools and a workshop now (as well as getting some other projects out of the way) I reckon that I will start work on the manifold quite soon. Basically, I will taking off as much of the casting marks as possible and having it powdercoated grey. Also, will be adding a shiney new fuel rail (not expecting any performance benefits - just for looks) and give the injectors a service. I'm hoping that have all that done by the next Skidpan Day at the end of April
__________________
 Exhaust: Autoexe headers; Custom midpipe; Racing Beat catback Engine: AWR mounts; Twiggy cams; Custom CAI; RR Racing UDP; Mishimoto rad EMS: Microtech LT-10; J&S Safeguard; Gearbox: MSP LSD; Fidanza flywheel; 5th gear Rims/Suspension: MX-5 rims; Tokico Illuminas; Eibach Pro-kit; Progress RSB; AutoExe STB Exterior: MSP front lip & rear spoiler; Matt V headlights; AutoExe grill; EDM tails Interior: JVC AVX-77; Autometer gauges; DaveBs; B&M shifter Projects to come: Engine rebuild |
||
|
|
|
|
12-01-2010, 08:15 PM
|
#25 |
|
Senior Member
Join Date: Jun 2008
Location: Auchenflower, Brisbane
Car: Blue SP20
Posts: 2,782
|
Nice work
Yeah figured that if you used the new mani youd get a intake seeing as you didnt have one. Are you going to use 646 TB as well?
__________________
|
|
|
|
|
12-01-2010, 08:33 PM
|
#26 |
|
Senior Member

Join Date: Sep 2004
Location: Logan prefecture
Car: Touge monster
Posts: 7,585
|
Use a big-bore TB [65-70mm ID] from a Nissan SR/RB motor with the same bolt centres.
Gav. |
|
|
|
|
13-01-2010, 01:16 PM
|
#27 | ||
|
SP20 Member!
|
Quote:
Quote:
What I am going to do is give the EGR and idle control valve a good clean and service before everything goes back together. I also want to gut the MAF that came with the K&N intake to reduce restriction while still looking stock .Also, I think getting the intake manifold ported slightly (or at least port-matched to the gasket) would be easier done before it goes on the car. Finally, I have a vacuum block that I need to find a mounting spot for and then tee a hose off the brake booster as the vac source. I also need to figure out how many things need a vac source and what size hose they are in order to get the correct adaptors and new vac hose. So, not much to do 
__________________
Exhaust: Autoexe headers; Custom midpipe; Racing Beat catback Engine: AWR mounts; Twiggy cams; Custom CAI; RR Racing UDP; Mishimoto rad EMS: Microtech LT-10; J&S Safeguard; Gearbox: MSP LSD; Fidanza flywheel; 5th gear Rims/Suspension: MX-5 rims; Tokico Illuminas; Eibach Pro-kit; Progress RSB; AutoExe STB Exterior: MSP front lip & rear spoiler; Matt V headlights; AutoExe grill; EDM tails Interior: JVC AVX-77; Autometer gauges; DaveBs; B&M shifter Projects to come: Engine rebuild |
||
|
|
|
|
13-01-2010, 01:18 PM
|
#28 | |
|
Senior Member
Join Date: Sep 2004
Location: Logan prefecture
Car: Touge monster
Posts: 7,585
|
Quote:

|
|
|
|
|
|
13-01-2010, 01:39 PM
|
#29 |
|
Senior Member
Join Date: Jun 2008
Location: Auchenflower, Brisbane
Car: Blue SP20
Posts: 2,782
|
Is the SR throttle body already on the car?
EDIT: Guess that strut brace is gonna have to come off again
__________________
Last edited by Ice88; 13-01-2010 at 01:43 PM. |
|
|
|
|
13-01-2010, 02:25 PM
|
#30 | ||
|
SP20 Member!
|
Quote:
Quote:
Yes, the strut brace will have to come off when the new intake manifold and intake piping goes on. The strut brace was a pain to get it in the way it is now - still a couple of bolt, nut and a/c line issues to work through. But once I have figured those out then getting it on and off next time will be easier . And as everything will be done in one hit, then I only have to take it off and put it back on again one time
__________________
Exhaust: Autoexe headers; Custom midpipe; Racing Beat catback Engine: AWR mounts; Twiggy cams; Custom CAI; RR Racing UDP; Mishimoto rad EMS: Microtech LT-10; J&S Safeguard; Gearbox: MSP LSD; Fidanza flywheel; 5th gear Rims/Suspension: MX-5 rims; Tokico Illuminas; Eibach Pro-kit; Progress RSB; AutoExe STB Exterior: MSP front lip & rear spoiler; Matt V headlights; AutoExe grill; EDM tails Interior: JVC AVX-77; Autometer gauges; DaveBs; B&M shifter Projects to come: Engine rebuild |
||
|
|
|
|
13-01-2010, 06:52 PM
|
#31 | |
|
SP20 Member!
|
Quote:
 If I look to change the throttle body in the future, I will open up the thread to discuss it then. Right now, the major push is to get the intake and manifold prepped and ready 
__________________
Exhaust: Autoexe headers; Custom midpipe; Racing Beat catback Engine: AWR mounts; Twiggy cams; Custom CAI; RR Racing UDP; Mishimoto rad EMS: Microtech LT-10; J&S Safeguard; Gearbox: MSP LSD; Fidanza flywheel; 5th gear Rims/Suspension: MX-5 rims; Tokico Illuminas; Eibach Pro-kit; Progress RSB; AutoExe STB Exterior: MSP front lip & rear spoiler; Matt V headlights; AutoExe grill; EDM tails Interior: JVC AVX-77; Autometer gauges; DaveBs; B&M shifter Projects to come: Engine rebuild |
|
|
|
|
|
07-02-2010, 10:58 PM
|
#32 |
|
SP20 Member!
|
Well, there was progress today
After several months of fart-arsing around I finally got things moving on the gauges. I finished up with the speaker-wire connections that will provide power, ground and illumination. They are now bolted-in solidly in behind the dash and all that remains is to connect all the wires to their sources and it is ready. Next was the DIN slot, triple gauge holder. After examining a couple of options I stuck to my original plan of using an Evo 8 triple gauge dash piece. I had to trim a bit of the dash behind the centre console facia but with a bit of foam lining, you won't be able to tell from the outside. I still want to adjust the gauge holder a little more to the left and lower the right side down a bit to get it sitting more flush. After that, (to finish all of this off) I need to install the gauges, connect up all the gauge wiring and get the sensors connected. Getting the sensors connected will require a larger/cleaner grommet in the firewall. I will try to get some pics up in the next couple of days. Good to get some progress but still some things to do! ") Oh, and I got word that my last engine will start its journey across the Pacific next week
__________________
Exhaust: Autoexe headers; Custom midpipe; Racing Beat catback Engine: AWR mounts; Twiggy cams; Custom CAI; RR Racing UDP; Mishimoto rad EMS: Microtech LT-10; J&S Safeguard; Gearbox: MSP LSD; Fidanza flywheel; 5th gear Rims/Suspension: MX-5 rims; Tokico Illuminas; Eibach Pro-kit; Progress RSB; AutoExe STB Exterior: MSP front lip & rear spoiler; Matt V headlights; AutoExe grill; EDM tails Interior: JVC AVX-77; Autometer gauges; DaveBs; B&M shifter Projects to come: Engine rebuild |
|
|
|
|
07-02-2010, 11:08 PM
|
#33 | |
|
Moderator
Join Date: Oct 2005
Location: Ipswich, Queensland
Car: 2002 Mazda Astina SP20 2006 Mazda 6 GY Wagon
Posts: 9,769
|
So what gauges are you putting in? I wouldnt mind adding some to mine, but really is no point in putting them in the centre console piece due to the DVD player, only option is in the dash gauge plastic surround
Quote:
__________________
|
|
|
|
|
|
08-02-2010, 01:42 AM
|
#34 | ||
|
SP20 Member!
|
Quote:
The three gauges I am about to put in are transmission temperature, exhaust gas temperature (EGT), and fuel pressure. Yeah, when I was picking out my headunit, having the DIN triple gauge holder was a major consideration. Thankfully everything fits in. There are a couple of people in the States that are going to start producing the dash gauge console with one or two 52mm gauge holders. Not sure if you have seen the threads, but I can post them in your build thread I you like. I wont be putting in any more round gauges after these three go in, so I dont need those cluster surround gauge holders. Quote:
__________________
Exhaust: Autoexe headers; Custom midpipe; Racing Beat catback Engine: AWR mounts; Twiggy cams; Custom CAI; RR Racing UDP; Mishimoto rad EMS: Microtech LT-10; J&S Safeguard; Gearbox: MSP LSD; Fidanza flywheel; 5th gear Rims/Suspension: MX-5 rims; Tokico Illuminas; Eibach Pro-kit; Progress RSB; AutoExe STB Exterior: MSP front lip & rear spoiler; Matt V headlights; AutoExe grill; EDM tails Interior: JVC AVX-77; Autometer gauges; DaveBs; B&M shifter Projects to come: Engine rebuild |
||
|
|
|
|
19-02-2010, 03:04 PM
|
#35 |
|
SP20 Member!
|
So, my triple gauge DIN install is complete! Yay!
Firstly I had to finish off the wiring behind the dash, which was a bit of challenge but has turn out better than expected. Actually putting in the gauges is going to be a piece of cake when I get to it. And whle I was in the guts of the centre console I found that my head-unit was slowly falling down, so I quickly whipped up a small bracket and the headunit is much more secure This was taken quite a bit of time to get finisheed due to several options being investigated, a change of address, and general lack of time. I tried the standard Autogauge triple gauge holder but it didn't fit all that well and I found that it heated up very quickly in a hot car. So I went with my original thought which was to use a holder designed for an Evo 8. I trimmed the dash behind the radio console surround a bit in order to get things fitting a bit more snuggly. The gauge holder itself is simply bolted into the dash (behind the console surround where you cant see it) in the top-left and bottom-right corners. I have also put in a few bits of foam just to give it a nice trim and cover up some of the holes that were the result of the headunit install. The end result is fantastic! It is very solid and I am very confident that there will be no vibrations and very little maintenance required. At the moment I only have one gauge in at the moment because I have to move onto putting in the sensors for them :P but that should be the easy part Anyway, here are some pics! Enjoy! 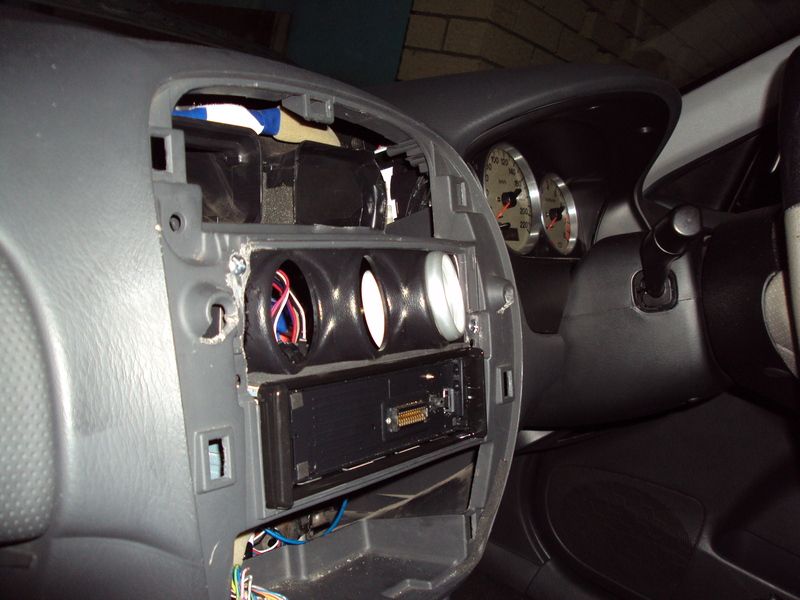 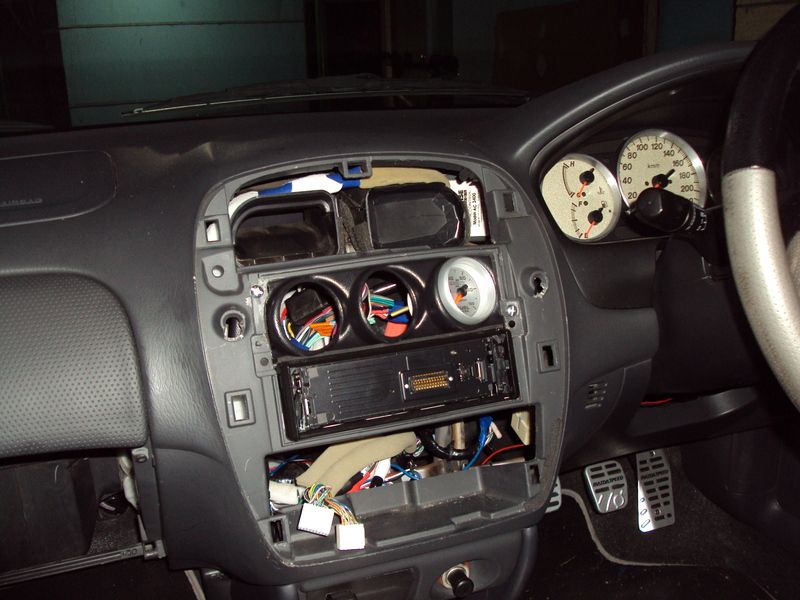 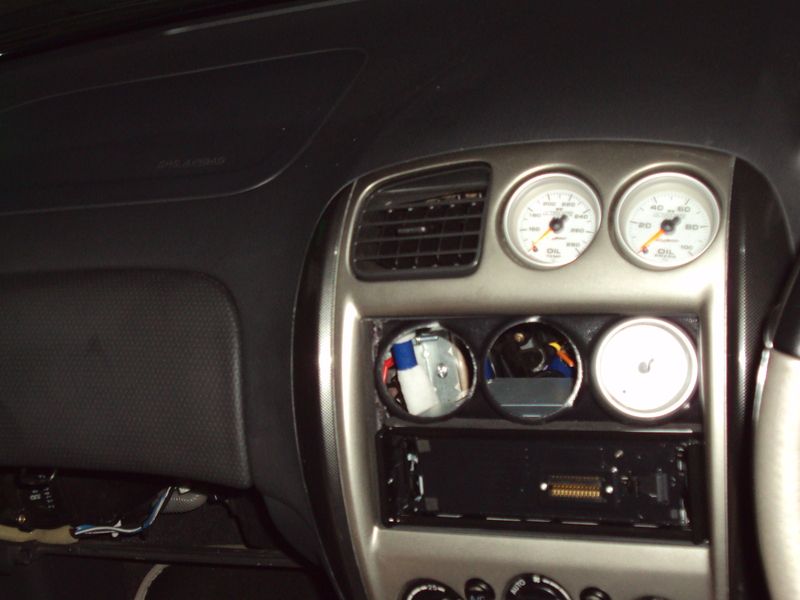 
__________________
Exhaust: Autoexe headers; Custom midpipe; Racing Beat catback Engine: AWR mounts; Twiggy cams; Custom CAI; RR Racing UDP; Mishimoto rad EMS: Microtech LT-10; J&S Safeguard; Gearbox: MSP LSD; Fidanza flywheel; 5th gear Rims/Suspension: MX-5 rims; Tokico Illuminas; Eibach Pro-kit; Progress RSB; AutoExe STB Exterior: MSP front lip & rear spoiler; Matt V headlights; AutoExe grill; EDM tails Interior: JVC AVX-77; Autometer gauges; DaveBs; B&M shifter Projects to come: Engine rebuild Last edited by Orion; 05-08-2014 at 10:45 PM. |
|
|
|
|
20-02-2010, 09:51 PM
|
#36 |
|
SHO~247

|
that looks cool!
nice work!! i like how the guages are white too and match the stock guages.
__________________
lots of bj/kn/kq laser parts for sale!!
custom boot install(fibreglass boxes),mazda 3 handbrake rachet,power window motors x 2,power window switches, guage rings its all gotta go!!! pm me any offers!! |
|
|
|
|
22-02-2010, 12:17 AM
|
#37 | |
|
SP20 Member!
|
Quote:
__________________
Exhaust: Autoexe headers; Custom midpipe; Racing Beat catback Engine: AWR mounts; Twiggy cams; Custom CAI; RR Racing UDP; Mishimoto rad EMS: Microtech LT-10; J&S Safeguard; Gearbox: MSP LSD; Fidanza flywheel; 5th gear Rims/Suspension: MX-5 rims; Tokico Illuminas; Eibach Pro-kit; Progress RSB; AutoExe STB Exterior: MSP front lip & rear spoiler; Matt V headlights; AutoExe grill; EDM tails Interior: JVC AVX-77; Autometer gauges; DaveBs; B&M shifter Projects to come: Engine rebuild |
|
|
|
|
|
22-02-2010, 12:46 AM
|
#38 |
|
SP20 Member!
|
Last engine mount is in!
Well, 6 months after I ordered it, my last AWR engine mount finally arrived on Friday. I don't really want to go over the story behind that in this thread but it was due to some bad timing and some other factors.
So, today I had a spare couple of hours in the morning and in it finally went. It was a bit of pain because of the alarm bracket got in the way and then I wasn't quite sure what to do with the ground from the alternator, but I got there in the end. I have stolen Marc's picture because it looks exactly the same as his and I can't be bothered taking my own photo at this stage. Here it is - thanks Marc 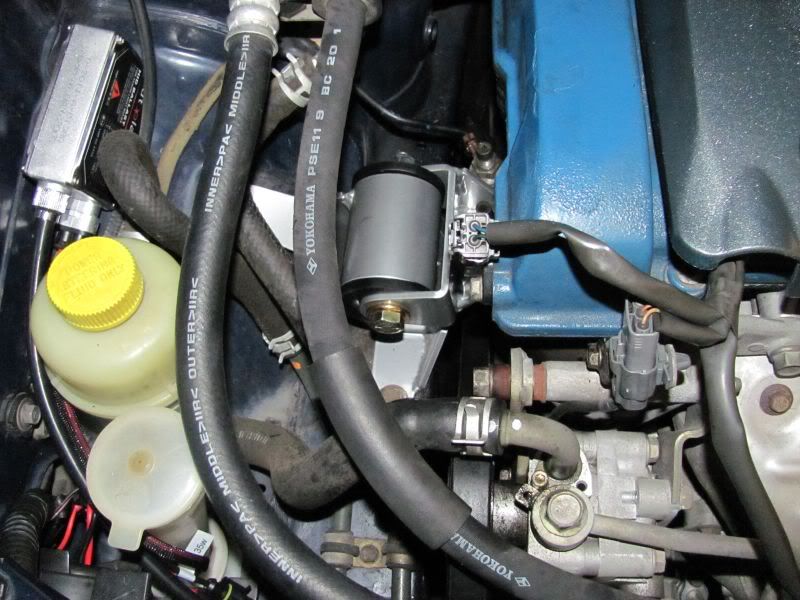 Impressions of the effect of the mount are generally good. Power goes down to the road much better and there is almost no wheel hop anymore. The engine feels more solidly connected to the chasis. Also, shifting through the gears has tightened up and its much more direct. I can really get through the gears quickly (almost to the point of flat-shifting). The bad is that vibration in the cabin has increase a fair bit  . Previously with the stock driver's side mount (and the associated Coke can modification ) the vibrations weren't too bad - noticeable but not too bad. Now there is a definite vibration in the cabin and several new rattles have developed. Hopefully this will settle down over the next couple of weeks but even if it doesn't, its not like I going to take it off . Previously with the stock driver's side mount (and the associated Coke can modification ) the vibrations weren't too bad - noticeable but not too bad. Now there is a definite vibration in the cabin and several new rattles have developed. Hopefully this will settle down over the next couple of weeks but even if it doesn't, its not like I going to take it off Anyway, I'm glad that I now have a complete set of AWR 70 Duro mounts in the car. On to other projects now
__________________
Exhaust: Autoexe headers; Custom midpipe; Racing Beat catback Engine: AWR mounts; Twiggy cams; Custom CAI; RR Racing UDP; Mishimoto rad EMS: Microtech LT-10; J&S Safeguard; Gearbox: MSP LSD; Fidanza flywheel; 5th gear Rims/Suspension: MX-5 rims; Tokico Illuminas; Eibach Pro-kit; Progress RSB; AutoExe STB Exterior: MSP front lip & rear spoiler; Matt V headlights; AutoExe grill; EDM tails Interior: JVC AVX-77; Autometer gauges; DaveBs; B&M shifter Projects to come: Engine rebuild |
|
|
|
|
22-02-2010, 09:14 AM
|
#39 |
|
HONEYWELL REPRESENT

Join Date: Aug 2005
Location: Salisbury - Inner City
Car: 1997 BA Hardtop - Had a 2003 BJii J48 Sport20, and 2x bg SOHC astina hatches
Posts: 5,011
 |
dude lookin good
where'd u get the gauge holder from?????? looks very very neat.
__________________
|
|
|
|
|
22-02-2010, 11:17 AM
|
#40 | |
|
SP20 Member!
|
Quote:
Just some modification of the dash, bolt in the Autometer piece, and then some black foam as trimming to make it look nice.
__________________
Exhaust: Autoexe headers; Custom midpipe; Racing Beat catback Engine: AWR mounts; Twiggy cams; Custom CAI; RR Racing UDP; Mishimoto rad EMS: Microtech LT-10; J&S Safeguard; Gearbox: MSP LSD; Fidanza flywheel; 5th gear Rims/Suspension: MX-5 rims; Tokico Illuminas; Eibach Pro-kit; Progress RSB; AutoExe STB Exterior: MSP front lip & rear spoiler; Matt V headlights; AutoExe grill; EDM tails Interior: JVC AVX-77; Autometer gauges; DaveBs; B&M shifter Projects to come: Engine rebuild |
|
|
|
|
 |
|
|


 Linear Mode

