Go Back   AstinaGT Forums > Performance & Technical > Performance & General Maintenance

Reply
 
Thread Tools Display Modes
Old 04-10-2012, 08:37 PM   #21
himynameisbunny
AstinaGT Regular
 
himynameisbunny's Avatar
 
Join Date: Jul 2012
Location: Sutherland Shire, Sydney, AUS
Car: 97 Astina BA
Posts: 432
Quote:
Originally Posted by project.r.racing View Post
there is 2 types?
Quote:
Originally Posted by Ziggy-F View Post
A real size 323F BA window guide roller \ pulley made by a guy from mazda club Israel.

the brown roller:


the black roller:

4char
himynameisbunny is offline   Reply With Quote
Old 04-10-2012, 08:37 PM   #22
project.r.racing
Senior Member
 
project.r.racing's Avatar
 
Join Date: Sep 2004
Location: n/a
Car: n/a
Posts: 10,929
how many bushes are in each window. and how many of each type are in each window?
project.r.racing is offline   Reply With Quote
Old 04-10-2012, 09:20 PM   #23
himynameisbunny
AstinaGT Regular
 
himynameisbunny's Avatar
 
Join Date: Jul 2012
Location: Sutherland Shire, Sydney, AUS
Car: 97 Astina BA
Posts: 432
Quote:
Originally Posted by project.r.racing View Post
how many bushes are in each window. and how many of each type are in each window?
I think it's two of the brown and one of the black each, however I may be wrong. All the photos I've seen from that thread have been of four of the reproduced brown ones which is what I based my calculation on.

As I haven't had the door apart yet, I think our best bet is to ask cookie.
himynameisbunny is offline   Reply With Quote
Old 04-10-2012, 10:06 PM   #24
himynameisbunny
AstinaGT Regular
 
himynameisbunny's Avatar
 
Join Date: Jul 2012
Location: Sutherland Shire, Sydney, AUS
Car: 97 Astina BA
Posts: 432
Scrap that previous post.

Google-fu mode activated: medium difficulty.

Quote:
Posted by Stasik @ 10-01-11, 04:21

Hello everyone!

I'm very sorry for the delay created by the annual training at work. Almost a month and I was not at home and really did not have time to publish this thread though I promised a lot of people here.

As you know, the mechanism of the windows Mazda 323F BA is very problematic. Today it is very difficult to find such a vehicle mechanism is intact. The main problem of these mechanisms is a hard rubber rollers grab the window whose role in the rails and allow it to move smoothly. In time, these rollers are destroyed and require replacement. Hang of some of this Code does not and can not be purchased separately but only together with a mechanism which cost the company 600 NIS. A lot of people on the forum have raised this problem and the only lipstick was found carved agree to these rollers produce some plastic. I talked to a 10 engravers and none of them wanted to take this job that does not pay to mess with such a fine job that takes a lot of time. Ultimately is etch agreed!

I know that many people suffer from this problem and Motzayem a solution. To help you I am ready to book a group of these rollers according to the quantity you will need.

Stylus requires price is $ 60 for one wheel. I know it's really not cheap, but currently there is no other solution. On the other hand, I think the price is reasonable. Instead of paying 600 NIS for a new mechanism worth 120 shekels of two rollers of the door.

There are two types of pulleys:
One. Middle of the track roller - conical shape.


2. Pulley side of the tracks - a square shape.
http://img80.imageshack.us/img80/9383/96252146.jpg

Two rollers together:


Each door has two rollers - one square and one in the form of a cone.
4-door car. Total 8 rollers: 4 of one type and 4 of the second kind.


What I need from you:
1. The amount of rollers you need according to their type.
2. A private message you wish to order with all the details of the amount of rollers.
3. Transfer \ deposit money by the amount of rollers.

Who made contact with me, I'll send him the message details the details of my bank account to make thick \ deposits. For those interested there is also PAYPAL.

Booking will be on 2011 \ 02 \ 30
Do you have more than a month and a half to tell me and transfer the money.
I make a one-time book group!
Booking will be only for those who passed the money until the day of booking.

You are invited to my project, which explains and details the process of replacement of these rollers:
http://www.mazdaclub.co.il/forum/showthread.php?t=1981

Waiting for private messages!

Sketches of rollers for those interested:
See technical diagrams previously posted in thread
Fitment guide:
Quote:
Dear club members!

I'm sorry for the delay. For a long time I promise people post this thread and do not have time. I had a particularly difficult month - an annual training work. I hardly home and this is the cause retardation.

Introduction:
As you know, the windows above model's doors are without a frame which is very complicate form of mechanism that allows opening and closing of windows. Now very hard to find in this kind of vehicle that its normal mechanisms. Well forum This issue came up many times and not found a solution. I came across this vehicle malfunction and effort is the solution!

General explanation:
Its front poverty mechanisms very similar rear doors like the explanation refers to both equally. Shape of the window mechanism Frameless complicated for two reasons. Nation of the window with frame, no frame mechanism should not just pick a window, but also tighten it to the rubber around the door and keep the opacity of the vehicle. Built mechanism by which the two leading tracks are tightening and direction of the window and the support that is given. In a moving window guide rails on the hard rubber rollers which prevent free and allow easy sliding of the window. Over time, in the hot weather of the country, these rollers drying and destroyed. As I understand, these rollers are terrifying part requires replacement.

Dissolution

1. Dismantling the door
I think unnecessary Euphrates the decomposition process of covering the door. I think that anyone who has knowledge of the basis of knowledge to do it without a problem. In two words: wiper door - bolt of the door opening handle, two screws inside the cell's coverage. Back door - there is only one screw door opening lever. Stay connected with clips that are released by a slight pull out from the bottom to the Hailion of coverage. With the Respondent has under cover so it has to be downloaded at least partially because it would interfere with the dismantling of the apparatus.

2. Dismantling and removing window
Window wired using three screws. Attention! Screw one out of three is screw a promise that must open up to the end (bottom screw). Two other screws do not need to open all the way but only release. This will prevent the window fall into the door and will help you later in his lineup. To reach these screws you need to download the window until the middle and use the exponent and Boxe to open them. Unfortunately I do not have a picture of these screws in the door. This is how it looks when the window out:


One. Bottom screw loose until the end.
Second. Released two other Bergman bit.

All that remained to dismantle to pull the window out of it only two limiting sitting in Hailion the door. Their job is to limit the window at his supreme communion from becoming more than necessary. This is where the limit:


The picture you see only the holes of the screws because my case is not put on the limit. Open the screws and remove the restricting out. The image is also wiper door. Limit of the rear windows are exactly the same places.

In addition to allowing the window to get out there to close the screw direction of the apparatus to the end (Section 3 "dissolution mechanism"). Before closing screws open the nuts sitting on them.
Now you can gently remove the door window up.

3. Dissolution mechanism
Main mechanism that tracks the middle which is connected to the electric motor actually makes the window move. First, disconnect the electrical connection of the engine, releasing his thread all kinds of clips with which it is occupied and open the nuts that hold the motor:

Open three bolts that take the middle track:


Attention! Screws Hailionim middle of the tracks are intended direction of the apparatus. They draw the mechanism and built form of nut and bolt so note that when you open them only nut open. Screw should remain in place. Screw should be an internal key by which you can catch it or direct. To get the window out these screws should be closed as much as possible. That way you release the mechanism and the window itself.

After opening the screws of Hnmoa and the tracks in the middle, you can get them out the door. First time process is a little complicated. It took me a while before I take out and put these mechanisms.

Rear door:
Like I said, backdoor mechanism is very similar to the foreground. Still following picture shows the breakdown of the back door:


[U]Check pulleys
Every door there are two pulleys. After the dissolution mechanism, one wheel should stay on the segment from under the window itself and the middle track roller Buch Sfirktm. Check the condition of the rollers:


If the pulleys are not in \ cracked \ Broken \ did not round \ curves, must replace them. Another mechanism will not work smoothly, make freedom in and prevent the full closure.

Types of rollers
Like I said, every window there are two pulleys. Two of these rollers are not identical.
One. Direct rail - black wheel rigid (plastic) Suppose a cone shaped.
2. A second leading rail (roller sitting on the window itself) - brown roller (hard rubber) is built in a square.

Preparation \ Buy the rollers
After many online searches, shops and Mazda provider is not such parts. These rollers no ID because it's part of coming together with a mechanism which cost NIS 600 New Genuine Mazda. It took me a long time to find a stylus that would produce these pulleys. The problem is that this work is very delicate, time consuming and not paid any price for a stylus. My friend is using a stylus agreed to prepare these rollers. The material chosen for the production of parts is a pole Aokolon (a type of plastic) with a diameter of 3 cm. Following several sizes of rollers mistakes, and I came Stylus optimal learning a different way some extent the original rollers.

Picture new blocks of both types:

See above quote

For those interested to order these ways the rollers please contact the following thread:
http://www.mazdaclub.co.il/forum/showthread.php?p=16910

Replacement pulleys - direct rail

One. Dismantling the middle rail (engine)

To replace the roller middle rail must dismantle it. Its dissolution requires disconnecting the cables of the motor system. In general, you can assemble the cables reversed or confused between them because it just does not fit. But we have to remember what and where joints to know then put away.

Unfortunately I can not find the pictures of the mechanism apart to show you the process of decomposition. But I'll try to explain as clearly as possible.

Two black wires coming from the engine to the tracks connect at Hailion and its lower part. There is some Hailion white wheel which sits in the cable and at the bottom there is a white clip with a small latch. To extract the calypso, need to click on the little latch and push the Calypso side until he got out. Calypso Publishing basically frees up cable that stretched before.

Remove the two cables pierces from under which he was sitting in a window:


Pull the segment together with the pulley tracks. The pulley can go only through Hailion side of the tracks. Zsa segment after dissolution:


In this picture you see a penis without a wheel to it. The pulley was broken and remained in the track.

2. Replacement \ installation of new roller

As you can see, Mazda's engineers ignored us enough and built the penis, where the pulley sits as an integral part segment. Of course it makes it difficult for us in the replacement of the pulley. To allow the replacement We will make this penis penis can be broken. It is important to note that this phase requires a wide knowledge using special tools such as: Goujon (Internal Threaded preparation), whetstone \ disk.

Start the work!
Take the segment:


First of all with the grindstone lower the head of the penis that:
This picture you can already see the hole fever in the penis. Do not rush! This is the next step ...


Now it is very important to match the correct screw. Here the knowledge required to prepare Threads. I'm not going to describe here the preparation process of the screw that is simply impossible. Must learn it acts!
Two words: suitable screw with a flat head as much as possible. Head too high pulley not allow the introduction into the track. In the penis, right in the middle, drill a hole through the penis almost to the end. Copyright screw by screw selected. Here you see a penis with a screw will:


Now you need to shorten the penis to the height of the inside of the pulley.
Penis picture before sharpening. Higher pin from the middle of the pulley:

Penis picture after grinding. Higher adjusted the height of the inside of the wheel:


Please note: It is important not to rush this step. Need to sharpen a bit and measure after it some more and try again. The goal is to prevent unnecessary Freedom wheels after closing screw and yet allow her to walk around the penis.

Suitable Scheibe by the diameter of the screw and by the diameter of the middle part of the pulley:


Put some grease on the penis, dressed pulley, dressed Scheibe on the screw and close. I also used the Block - Tate to prevent unwanted opening of the screw in the future.


Although I signed for a screw with a flat head, he still was not too high not let me put the roller into the track. Decided to sharpen the screw head. After sharpening still remains a place screwdriver on the screw head. So we still can open it if necessary.

3. Assembly of the middle rail

The assembly is done in reverse order. Of course you clean the old grease tracks had long lost its features only make it harder on the window to move. Private investors it with new grease. Put the roller into the track. Connect the cables back on the latch on the segment. Use the guy more Sicootz the springs of cables sitting on the engine. This will allow you to restore the Calypso of the cable back without much effort. Now you can assemble the apparatus back into the door!

Replacement pulleys - second track

Replace the second pulley sitting on the window itself is simple and requires no special knowledge or special tools other than a star key. Here engineers have been taken into account and the penis of the pulley can be dismantled. Just open it, private investors, dress new block and close back. Pulley Hhdsb been adjusted by height so there should be more free here. Also make sure the wheel turns freely after the close of the penis. If there is extra freedom can adjust Scheibe minute and put it under the head of the penis.

This pulley of the window after replacement:


Rail supports - wiper door

In front of the door there is another track that is very important. It prevents freedom of unnecessary window. After you break the window and find it out, you can see a small hole at the front. If you see a hole and there is a black rubber clip that sits on it, so your situation is not good. Many times, when Hglgllot destroyed, the window moves at the wrong angle. It makes calypso released. If your Calypso is not a window then run faster and look him in the door. If found please return it to the place. He closed with a pin underneath. If the penis is not taking it well, you can expand it a little. If you do not find one of these snaps so now I do not have a solution for you. In my car the previous owner probably found this part in the door. He probably did not know how important this part where he fell and just threw it. There is also a part of this code can not be purchased separately. Addition, it is very difficult to produce such part.

Rail supports - a back door

Supporting rails back door is in the back of the door. Usually there is no problem with it and have only Looda rubber stopper that sits on the window, and properly located.

Cleaning and greasing the rails

It is very important to try to clean the old grease and grease the rails with new grease. Good grease will keep you on the new rollers and allow rapid opening and closing of windows. Also the second leading track and the track supports can be dismantled for cleaning and greasing.

Train tracks (window)

The train tracks are in reverse order.
When you put a window in the door, you always have to start from the side of the track supports. Slightly rotate the window, place the side of the track supports and then put the pulley sitting on the window into its track. Then remove the window with your hand until mid door and dress it on two screws of the mechanism you just Shihrrtm not opened until the end. Remember?! Return the limit Hailionim of the window. Close all the screws almost all the way and go to the next step:

Since the mechanism Estate

One. Limit
With an electric button to close the window until the end. Do not forget to limit unintended yet and you can surf the window up and qualify may fall. Therefore always secure it with the hand. Stop the window, just point supreme communion, as it should be in the closed position. Close the door and make sure the window is indeed the right spot. Limiting holes allow you to move them up and down. Now move them to the point the most supreme communion until they meet with plastics round the window and in such a situation close to their screws. Open the window slightly and close it to the end several times to make sure it stops right place. If necessary, lowering or raising one bit limiting.

2. Rail direct
Like I said, two screws Hailionim occupying the middle tracks are intended for the mechanism. Closing these screws releases the mechanism (window) and start stretching it. Of course now you have to stretch it ie open the screws as needed. Attention! Lift mechanism changes the angle of the car window and pin it to the rubber around the door. Overstretching of the mechanism will cause difficulty in closing the door. Goal is to "find the middle"! get to the door closes easily and window clings good rubber and will not be waterproof or wind into the car. opening bit the screws, close the door and check. course, these directions must perform when the window is closed.

Only after aiming mechanism, strengthen all its nuts and dress back cover door.

It is important to note:
All tracks listed on the letter R and L in English. This marking of the track belongs to which side (LEFT \ RIGHT). If Htblbltm between the rails can always find the flag and use it. Also by this signal always understand the Hailion of the tracks and what the bottom. The engine also has the flag. And yet, I suggest you start with only one door and get involved with breaking down a few doors simultaneously. I always Tido where each part belongs.

Now you can enjoy windows that open and close smoothly and pay!
I hope that this project will help many people solve this problem in their cars!

Good Luck!
So there you have it

Last edited by himynameisbunny; 04-10-2012 at 10:25 PM.
himynameisbunny is offline   Reply With Quote
Old 04-10-2012, 10:49 PM   #25
70NYD
Veni, vidi, vici
 
70NYD's Avatar
 
Join Date: Mar 2008
Location: Brisbane
Car: 1996 BA Hatch & 2005 RX8
Posts: 4,911
The issue with this on the lathe is that it has to be machined from two sides hence you need to turn I around in the chuck..
It would be a lot more cost effective / quicker to cast it out of something.
I think hdpe would do this job fairly good, but it's not flexible enough to be able to slip over the rivet. But you want flexibility or longevity, can't have both.. Not for cheap anyway
Other option is to get t cast out of brass.. Would cost about ~100ish per mould, then you spit out 1000, sell them online
I was going to do this, a while ago, I'm just too freaking lazy
__________________
70NYD is offline   Reply With Quote
Old 04-10-2012, 10:50 PM   #26
himynameisbunny
AstinaGT Regular
 
himynameisbunny's Avatar
 
Join Date: Jul 2012
Location: Sutherland Shire, Sydney, AUS
Car: 97 Astina BA
Posts: 432
Quote:
Originally Posted by 70NYD View Post
The issue with this on the lathe is that it has to be machined from two sides hence you need to turn I around in the chuck..
It would be a lot more cost effective / quicker to cast it out of something.
I think hdpe would do this job fairly good, but it's not flexible enough to be able to slip over the rivet. But you want flexibility or longevity, can't have both.. Not for cheap anyway
Other option is to get t cast out of brass.. Would cost about ~100ish per mould, then you spit out 1000, sell them online
I was going to do this, a while ago, I'm just too freaking lazy
Ryan is actually going through SuperPro and they'll be cast out of poly (i.e. poured into a mould) if I'm not mistaken. Or have I got how they make poly parts all wrong
himynameisbunny is offline   Reply With Quote
Old 05-10-2012, 07:10 AM   #27
project.r.racing
Senior Member
 
project.r.racing's Avatar
 
Join Date: Sep 2004
Location: n/a
Car: n/a
Posts: 10,929
correct. as per my earlier post. dude just said a alloy cast.

and it's not superpro. but the company that makes the bushes for superpro.

so we need 8 bushes for a full car. 4 of each type. and 2 moulds.

one option is to try and get as many buyer together and divide the cost amoungst all the buyers.

or i'll pay for the moulds, and charging $50-$60 a car for the bushes.

Last edited by project.r.racing; 05-10-2012 at 07:18 AM.
project.r.racing is offline   Reply With Quote
Old 05-10-2012, 08:51 AM   #28
70NYD
Veni, vidi, vici
 
70NYD's Avatar
 
Join Date: Mar 2008
Location: Brisbane
Car: 1996 BA Hatch & 2005 RX8
Posts: 4,911
I would be down for a set
__________________
70NYD is offline   Reply With Quote
Old 05-10-2012, 09:16 AM   #29
himynameisbunny
AstinaGT Regular
 
himynameisbunny's Avatar
 
Join Date: Jul 2012
Location: Sutherland Shire, Sydney, AUS
Car: 97 Astina BA
Posts: 432
Quote:
Originally Posted by project.r.racing View Post
correct. as per my earlier post. dude just said a alloy cast.

and it's not superpro. but the company that makes the bushes for superpro.
Can I be awared as to who this mob is, for future reference? I remember it being Fulcrum suspension but I'm probably wrong.

Quote:
Originally Posted by project.r.racing View Post
so we need 8 bushes for a full car. 4 of each type. and 2 moulds.
You have passed the comprehension test!

Quote:
Originally Posted by project.r.racing View Post
one option is to try and get as many buyer together and divide the cost amoungst all the buyers.

or i'll pay for the moulds, and charging $50-$60 a car for the bushes.
Stop paraphrasing me

In terms of pricing, see below (click it, it's clicky):


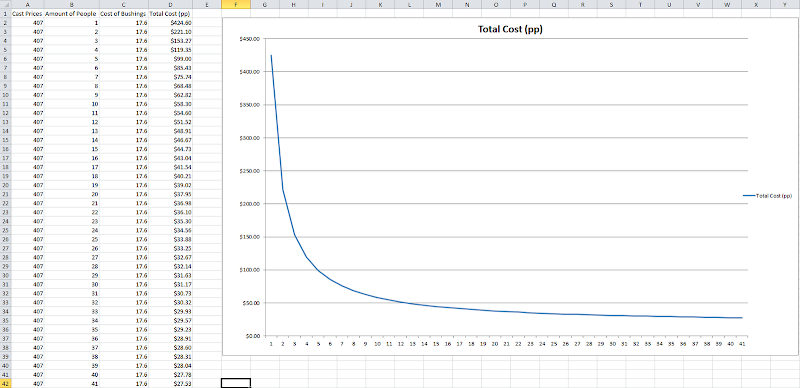
I wouldn't look at any less than 20 buyers methinks. Of course, you could always make up for more buyers and flog them on eBay

With here AND Club323F I don't think we'll have trouble gaining the interest.

We already know like 4 that are interested: myself, you, 70NYD, Rupe (pretty sure he was looking for some at some point), and I'm sure Mat, Cookie, and Sly will all want in too.

First things first would be to confirm about the second mould

Last edited by himynameisbunny; 05-10-2012 at 09:18 AM.
himynameisbunny is offline   Reply With Quote
Old 05-10-2012, 09:19 AM   #30
ghetto3
Senior Member
 
ghetto3's Avatar
 
Join Date: Sep 2011
Location: north coast nsw
Car: 97 ba 1.8 323
Posts: 799
On the foward edge of the window glass theres a black rubber(?) bung thing that is mounted through a hole in the glass itself, sliding in the very front runner. My drivers window is missing this piece which causes similar issues.
ghetto3 is offline   Reply With Quote
Old 05-10-2012, 09:32 AM   #31
himynameisbunny
AstinaGT Regular
 
himynameisbunny's Avatar
 
Join Date: Jul 2012
Location: Sutherland Shire, Sydney, AUS
Car: 97 Astina BA
Posts: 432
Quote:
Originally Posted by ghetto3 View Post
On the foward edge of the window glass theres a black rubber(?) bung thing that is mounted through a hole in the glass itself, sliding in the very front runner. My drivers window is missing this piece which causes similar issues.
Could you point out the piece that you're talking about from any of the pics above?

At least we're eliminating this weak link
himynameisbunny is offline   Reply With Quote
Old 05-10-2012, 09:32 AM   #32
project.r.racing
Senior Member
 
project.r.racing's Avatar
 
Join Date: Sep 2004
Location: n/a
Car: n/a
Posts: 10,929
Quote:
Originally Posted by himynameisbunny View Post
First things first would be to confirm about the second mould
Already on that. Awaiting an email reply.

I have also asked for discounts regard larger quanity orders.
project.r.racing is offline   Reply With Quote
Old 05-10-2012, 09:34 AM   #33
project.r.racing
Senior Member
 
project.r.racing's Avatar
 
Join Date: Sep 2004
Location: n/a
Car: n/a
Posts: 10,929
Quote:
Originally Posted by himynameisbunny View Post
Quote:
Originally Posted by ghetto3 View Post
On the foward edge of the window glass theres a black rubber(?) bung thing that is mounted through a hole in the glass itself, sliding in the very front runner. My drivers window is missing this piece which causes similar issues.
Could you point out the piece that you're talking about from any of the pics above?

At least we're eliminating this weak link
if it's black and the front bush, then it's the cone bush.
project.r.racing is offline   Reply With Quote
Old 05-10-2012, 09:39 AM   #34
himynameisbunny
AstinaGT Regular
 
himynameisbunny's Avatar
 
Join Date: Jul 2012
Location: Sutherland Shire, Sydney, AUS
Car: 97 Astina BA
Posts: 432
Quote:
Originally Posted by project.r.racing View Post
Already on that. Awaiting an email reply.

I have also asked for discounts regard larger quanity orders.
In that case, an amended spreadsheet appears:


80 of each @ 20 buyers, 160 of each @ 40 buyers etc.
himynameisbunny is offline   Reply With Quote
Old 05-10-2012, 09:54 AM   #35
ghetto3
Senior Member
 
ghetto3's Avatar
 
Join Date: Sep 2011
Location: north coast nsw
Car: 97 ba 1.8 323
Posts: 799
Quote:
Originally Posted by himynameisbunny View Post
Could you point out the piece that you're talking about from any of the pics above?

At least we're eliminating this weak link
Its not shown, the alloy channel that carries front edge of glass, leading up to where rear view mirror mounts, there is a black bushing as well. As opposed to the two other bushings that also give dramas.
ghetto3 is offline   Reply With Quote
Old 05-10-2012, 05:01 PM   #36
project.r.racing
Senior Member
 
project.r.racing's Avatar
 
Join Date: Sep 2004
Location: n/a
Car: n/a
Posts: 10,929
just hit a massive roadblock.

set up costs the same per bush.

cost per bush the same.

minimum order of 100 per bush required! wasn't in first email!!!

two ways we can go with this:-

agree to buy a few extra sets and sell ouf at our own pace.

i pay for all, and resell setfor $70 shipped.

or if someone can find a cheaper alternative company.

Last edited by project.r.racing; 05-10-2012 at 05:04 PM.
project.r.racing is offline   Reply With Quote
Old 05-10-2012, 06:28 PM   #37
himynameisbunny
AstinaGT Regular
 
himynameisbunny's Avatar
 
Join Date: Jul 2012
Location: Sutherland Shire, Sydney, AUS
Car: 97 Astina BA
Posts: 432
Quote:
Originally Posted by project.r.racing View Post
just hit a massive roadblock.

set up costs the same per bush.

cost per bush the same.

minimum order of 100 per bush required! wasn't in first email!!!

two ways we can go with this:-

agree to buy a few extra sets and sell ouf at our own pace.

i pay for all, and resell setfor $70 shipped.

or if someone can find a cheaper alternative company.
Not really a massive roadblock.

That's only 25 sets, which is $33.88 per person (including capital payment on casts).

Mind you, this is with the restriction that you can only buy the whole set (4 of each bush). I would highly recommend doing that if a GB happens.

This price also doesn't take shipping into consideration, although it would only take a bubble wrap bag ($1.20 from Auspost) and two 60c stamps to post.

My advice from here:
  1. Post a GB here
  2. Post a GB on Club323F
  3. Make sure that the listing says minimum 25 buyers, whole set (4 each) needs to be purchased.
  4. If there isn't enough interest within 2 weeks, cop the capital on the chin, get >= 25 sets made up and flog them here/Club323F/eBay.
  5. Don't try to flog them for $70 something bucks as it'll be harder to get people on the bandwagon.

As for a cheaper alternative, I reckon we've got these guys to run with it so we should stick with them. But there is a few promising alternatives out there, like APT.

Last edited by himynameisbunny; 05-10-2012 at 06:33 PM.
himynameisbunny is offline   Reply With Quote
Old 05-10-2012, 11:14 PM   #38
Clean_Cookie
obsessed-incomplete-broke
 
Clean_Cookie's Avatar
 
Join Date: Oct 2008
Location: Brisbane
Car: BA Hardtop/Hatch
Posts: 5,441
I'd sink $200 into the venture if it gets me perfect functioning windows.
__________________
Worklog
Clean_Cookie is offline   Reply With Quote
Old 06-10-2012, 12:39 AM   #39
ghetto3
Senior Member
 
ghetto3's Avatar
 
Join Date: Sep 2011
Location: north coast nsw
Car: 97 ba 1.8 323
Posts: 799
Group buy for a lathe and i or any of you could turn them out of acrylic, urerhane or whatever.we used too get 'skate' wheels and turn little 55mm 'skateboard' wheels out of them on lunch break at school. O'l shool. ..couldnt be that hard to do.
ghetto3 is offline   Reply With Quote
Old 06-10-2012, 12:55 AM   #40
70NYD
Veni, vidi, vici
 
70NYD's Avatar
 
Join Date: Mar 2008
Location: Brisbane
Car: 1996 BA Hatch & 2005 RX8
Posts: 4,911
You won't be able to push the hard plastic skate wheel over the rivet
And machining the cone taper by hand, for 25 sets (100 rollers) you will go nuts
Also turning and repositioning each time to insure the shoulder is right.. It's too long process for lathe for something so simple and higher quantity
__________________
70NYD is offline   Reply With Quote
Reply

Thread Tools
Display Modes

Posting Rules
You may not post new threads
You may not post replies
You may not post attachments
You may not edit your posts

BB code is On
Smilies are On
[IMG] code is On
HTML code is Off

Forum Jump


All times are GMT +10. The time now is 10:17 PM.


Powered by vBulletin® Version 3.8.7
Copyright ©2000 - 2024, vBulletin Solutions, Inc.
2001- 2010 AstinaGT