|
|
 17-10-2010, 05:11 PM
|
#61 |
|
SP20 Member!
 
|
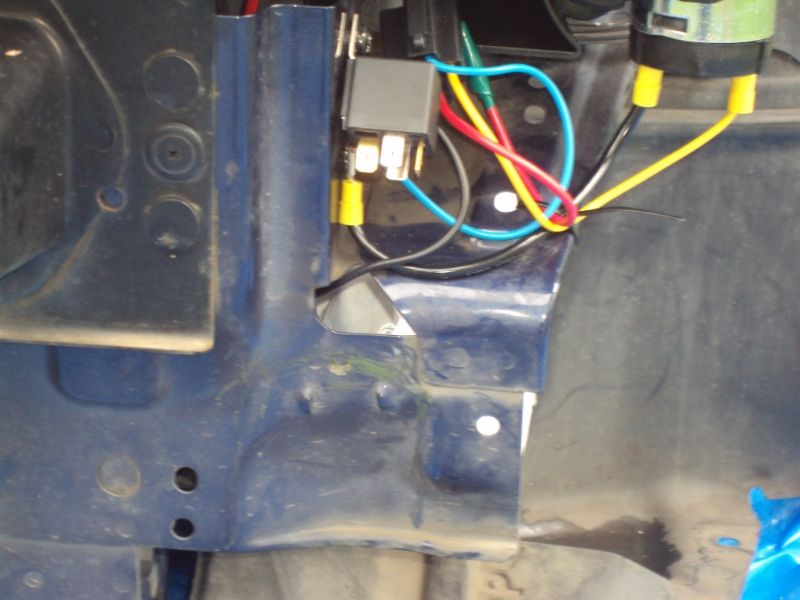
Fuse distribution block
So I have a number of accessories running the require power in the car. Some of these are already installed as best they can be by splicing wires and tapping into the stock fuse box.
Two things that are already in the car and definitely need power are the Microtech and the coilpacks. Things that are to be added in the near future that will require power are: - HID headlight ballasts (x2 obviously) - an aftermarket horn So, while I was at battery world a while ago I asked them how I could best supply power to all these items in a simple compact unit. I was sold a power distribution block which has 6 power and 6 ground points. It takes mini-fuses with a maximum of 30 amps each and the whole block can handle up to 100 amps in total. I had this lying around for a while deciding how best to hook it up and where to mount it. Eventually I put it where the battery used to be, mounting it using two bolts from the original battery tray (that is no longer there) and hooked it using a pre-existing bolt style connector for the battery relocation. Here are some pics of the finished project: 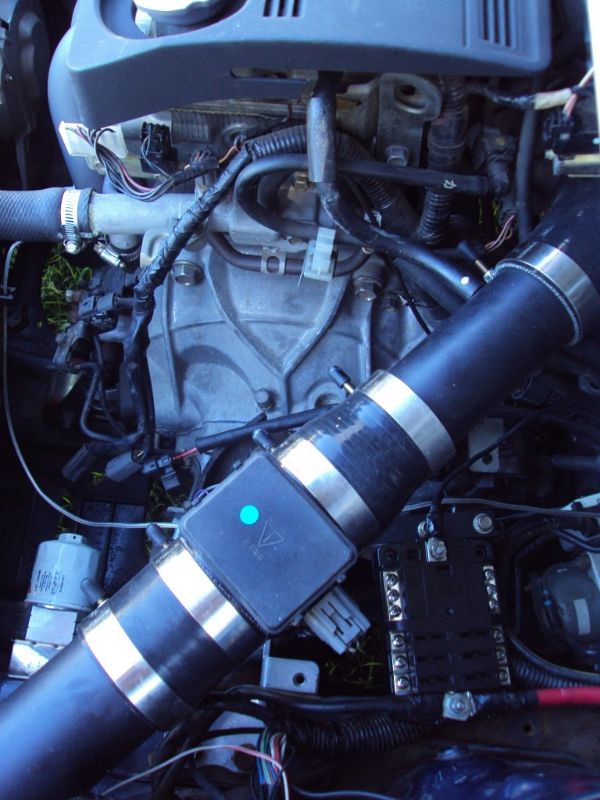 The power distribution block is in the bottom right of the picture. Here is what it looks like close up: 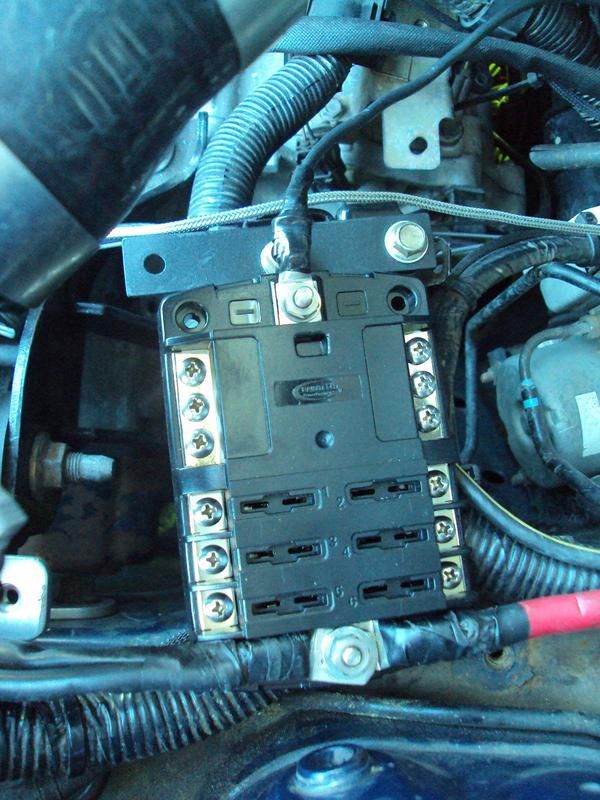 And this is it with the cover on: 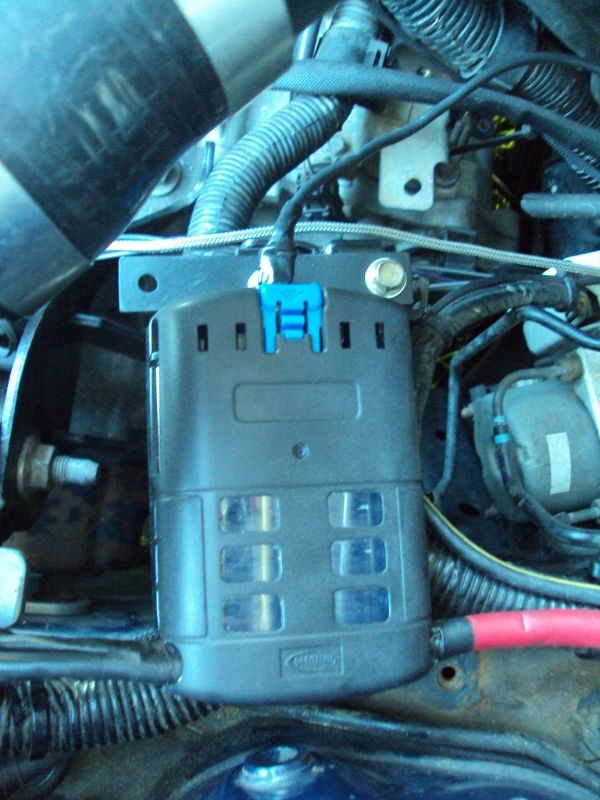 I will slowly bring the Microtech and coilpack power sources across over the next few weeks, but it will take a bit of planning as they require relays as they don't run while the car is switched off. I have completed a couple of other projects but I ran out of time to take piccies and do a write up but keep your eyes peeled as they should appear next weekend. Cheers 
__________________
 Exhaust: Autoexe headers; Custom midpipe; Racing Beat catback Engine: AWR mounts; Twiggy cams; Custom CAI; RR Racing UDP; Mishimoto rad EMS: Microtech LT-10; J&S Safeguard; Gearbox: MSP LSD; Fidanza flywheel; 5th gear Rims/Suspension: MX-5 rims; Tokico Illuminas; Eibach Pro-kit; Progress RSB; AutoExe STB Exterior: MSP front lip & rear spoiler; Matt V headlights; AutoExe grill; EDM tails Interior: JVC AVX-77; Autometer gauges; DaveBs; B&M shifter Projects to come: Engine rebuild Last edited by Orion; 05-08-2014 at 11:25 PM. |

|

|
|
17-10-2010, 10:03 PM
|
#62 |
|
Moderator

Join Date: Oct 2005
Location: Ipswich, Queensland
Car: 2002 Mazda Astina SP20 2006 Mazda 6 GY Wagon
Posts: 9,769
|
Hey Darryl,
Bit confused, when you say your going to run your HID's off this distributor block, do you not realise its all plug and play off the looms for the bulbs? Unless you have devised a plan I cant think of 
__________________
 ![[URL="http://www.astinagt.com/forums/vbpicgallery.php?do=view&g=590"]](image.php?s=d14322f1e13d8c87d2705e6b4bdd36a5&u=1216&type=sigpic&dateline=1355019352) |
|
|
|
|
18-10-2010, 12:33 AM
|
#63 | |
|
SP20 Member!
|
Quote:
I might well have it a bit wrong. I was under the impression that with the ballasts, I would have to power them indepenantly and use the headlight connector to switch them on and off. If the ballasts can be powered directly through the headlight connectors (and used for switching them on/off) then that would be brilliant as it would save a bit of wiring and free up some outputs on the fuse block. Btw, these are what I am getting  : :http://www.mazdas247.com/forum/showt...T-LOWER-PRICES
__________________
Exhaust: Autoexe headers; Custom midpipe; Racing Beat catback Engine: AWR mounts; Twiggy cams; Custom CAI; RR Racing UDP; Mishimoto rad EMS: Microtech LT-10; J&S Safeguard; Gearbox: MSP LSD; Fidanza flywheel; 5th gear Rims/Suspension: MX-5 rims; Tokico Illuminas; Eibach Pro-kit; Progress RSB; AutoExe STB Exterior: MSP front lip & rear spoiler; Matt V headlights; AutoExe grill; EDM tails Interior: JVC AVX-77; Autometer gauges; DaveBs; B&M shifter Projects to come: Engine rebuild |
|
|
|
|
|
18-10-2010, 12:57 AM
|
#64 |
|
Veni, vidi, vici

Join Date: Mar 2008
Location: Brisbane
Car: 1996 BA Hatch & 2005 RX8
Posts: 4,911
|
looking good darryl
your car is amazing manas for the hids since you have a low and high seperate you dont need the bixenon ballast which requires a constant power (from memory) but the retrofit is cool i mean WOW what a mad one charging 500 for these and a bit of patience haha awesome
__________________
 |
|
|
|
|
18-10-2010, 09:24 AM
|
#65 | |
|
SP20 Member!
|
Quote:
 Yeah, Matt V has done about 20 retrofits. While it isn't exactly cheap, I feel its one of those things that is better left to someone with those skills. There are some things I want to do myself and other things that I'm happy to leave to the professionals. Thanks for the comments
__________________
Exhaust: Autoexe headers; Custom midpipe; Racing Beat catback Engine: AWR mounts; Twiggy cams; Custom CAI; RR Racing UDP; Mishimoto rad EMS: Microtech LT-10; J&S Safeguard; Gearbox: MSP LSD; Fidanza flywheel; 5th gear Rims/Suspension: MX-5 rims; Tokico Illuminas; Eibach Pro-kit; Progress RSB; AutoExe STB Exterior: MSP front lip & rear spoiler; Matt V headlights; AutoExe grill; EDM tails Interior: JVC AVX-77; Autometer gauges; DaveBs; B&M shifter Projects to come: Engine rebuild |
|
|
|
|
|
18-10-2010, 04:46 PM
|
#66 |
|
Senior Member

Join Date: Nov 2006
Location: SE Brissy
Car: Old: 1989 DOHC Mazda 323 New: Nissan 180SX Type X
Posts: 2,135
 |
Looks good Daryll,
The sensor female to male fitting that you had a few pages earlier is a gas fitting, most taper in to each other for a nice seal. Love the bracket for the overflow, bout time you finished that :P Ive got 1 of those distributor blocks in the 180...awesome to hide **** behind the guards...+ splicing wires is messy...
__________________
Today you will die and then you will know what it feels like to live... Straights Are For Fast Cars, Corners Are For Fast Drivers: Colin McRae Visit My Ride:  http://www.astinagt.com/forums/vbpic...?do=view&g=319 Come see my deviantness....hehe http://dawnblade.deviantart.com/ |
|
|
|
|
18-10-2010, 07:11 PM
|
#67 |
|
Senior Member

Join Date: Mar 2009
Location: Brisbane QLD
Car: 2002 323 astina
Posts: 1,059
|
looking good darrel.
is ur coolant overflow bottle just an oil catch can?? I need to replace my stock overflow bottle but thought a catch can might be a bit small. and there isnt realy a way of filling it up?? I like ur intake, simple but smart, i never thought of just using straight hard tubing and just silicon bends.
__________________
If your not allowed to go fast, you might as well look fast |
|
|
|
|
18-10-2010, 08:33 PM
|
#68 | ||
|
SP20 Member!
|
Quote:
The only thing it might be is the gearbox fluid temp sensor fitting in the drain bung.Yeah, not quite enough room to put it in behind the guards and for just little annoying to open up the guards to hook up new items. I will have a chat to you another time about connectors you are using Quote:
The piping for the intake is stainless steel that have been HPC coated. Yeah, I spent a while nutting out what I wanted to do with the intake and how it would all go together and in the end I am pretty happy. I just need a small bracket to attach the MAF to the gearbox mount (for some extra support) and it will be all done.
__________________
Exhaust: Autoexe headers; Custom midpipe; Racing Beat catback Engine: AWR mounts; Twiggy cams; Custom CAI; RR Racing UDP; Mishimoto rad EMS: Microtech LT-10; J&S Safeguard; Gearbox: MSP LSD; Fidanza flywheel; 5th gear Rims/Suspension: MX-5 rims; Tokico Illuminas; Eibach Pro-kit; Progress RSB; AutoExe STB Exterior: MSP front lip & rear spoiler; Matt V headlights; AutoExe grill; EDM tails Interior: JVC AVX-77; Autometer gauges; DaveBs; B&M shifter Projects to come: Engine rebuild |
||
|
|
|
|
18-10-2010, 09:38 PM
|
#69 |
|
SP20 Member!
|
New accessories for the radio
So I have had some little projects floating around for the headunit, and as usual it has taken me ages to sort out how and where I wanted to fit them.
The two things that I have added to the headunit are the microphone for the BlueTooth connection for my mobile phone. I had it placed on the gauge cluster surround with bluetac for a while and it worked well there and was relatively discrete. So I used the mounting peg that was supplied and made it permanent. Here is a pic:  The missus took this, and she did a pretty good job . Maybe I will let her take more photos in future The other thing I bought a while ago and never figured how I was going to get fitted properly was a steering wheel remote control for the headunit. I was thinking about all kinds of brackets and other devices but it all seems too complex and hard. So in the end I just drilled through the plastic plug (opposite to the cruise control). For the other end I have used double-sided tape but I might to velcro and the tape is not holding up too well. Pic below: 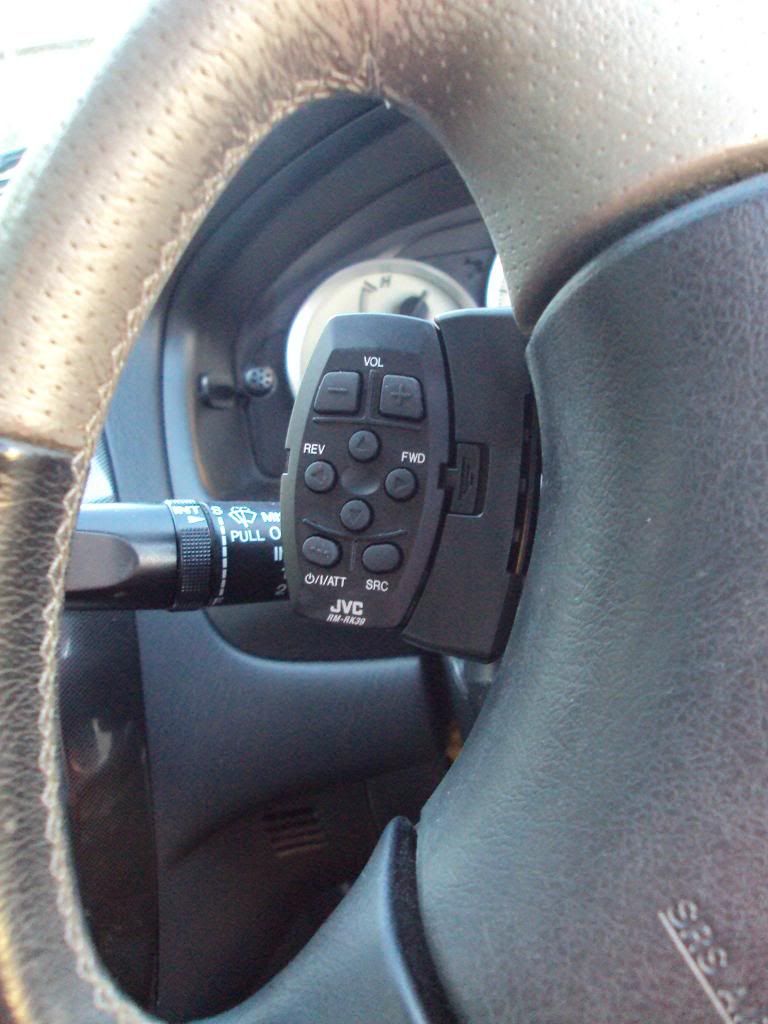 Its good to have some progress!
__________________
Exhaust: Autoexe headers; Custom midpipe; Racing Beat catback Engine: AWR mounts; Twiggy cams; Custom CAI; RR Racing UDP; Mishimoto rad EMS: Microtech LT-10; J&S Safeguard; Gearbox: MSP LSD; Fidanza flywheel; 5th gear Rims/Suspension: MX-5 rims; Tokico Illuminas; Eibach Pro-kit; Progress RSB; AutoExe STB Exterior: MSP front lip & rear spoiler; Matt V headlights; AutoExe grill; EDM tails Interior: JVC AVX-77; Autometer gauges; DaveBs; B&M shifter Projects to come: Engine rebuild Last edited by Orion; 05-08-2014 at 11:36 PM. |
|
|
|
|
31-10-2010, 11:03 AM
|
#70 |
|
SP20 Member!
|
Moved cruise control light
For a while now I have been annoyed at where my cruise control indicator light was positioned - down near the dimmer and foglight switches. I would have to physically turn and lower my eyes (and look around the steering wheel a bit) to see the indicator light and I couldn't see any of the road. Not good even if it is for only a second . I think there is supposed to be a light on the cruise control steering wheel controls but it has never worked
 I didn't need to extend any wires thankfully. My cruise control unit is a "factory" (dealer option aftermarket) unit that is mounted behind the instrument cluster towards the centre console. The cruise light wire runs down to the switch area under the gauge cluster so it is already long enough to go over the steering wheel shroud. The only tricky bit is that there is a wire that connects into the dimmer switch for some reason. I wasn't going to remove it ("if it ain't broke, don't fix it" mentality), so I just worked around it. It is just long enough to go from the module to the switch area and then back to the steering wheel shroud As for mounting the cruise light, I already have a ScanGauge II unit mounted in the steering wheel shroud. The ScanGauge has two RJ-45 ports, one on the back and one on the side. I have the ScanGauge OBD cable plugged in the back, so the RJ-45 port on the side is free. I simply got an RJ-45 plug (no wires), drilled a hole in it and mounted the light in there. I also had to drill a small hole in the steering wheel shroud as well but it was already cut up so I'm not worried Here is a the pic! 
__________________
Exhaust: Autoexe headers; Custom midpipe; Racing Beat catback Engine: AWR mounts; Twiggy cams; Custom CAI; RR Racing UDP; Mishimoto rad EMS: Microtech LT-10; J&S Safeguard; Gearbox: MSP LSD; Fidanza flywheel; 5th gear Rims/Suspension: MX-5 rims; Tokico Illuminas; Eibach Pro-kit; Progress RSB; AutoExe STB Exterior: MSP front lip & rear spoiler; Matt V headlights; AutoExe grill; EDM tails Interior: JVC AVX-77; Autometer gauges; DaveBs; B&M shifter Projects to come: Engine rebuild Last edited by Orion; 07-08-2014 at 04:48 PM. |
|
|
|
|
31-10-2010, 05:01 PM
|
#71 |
|
Administrator

Join Date: Mar 2002
Location: melb.vic.au
Car: AZ-1, Astina Hardtop Turbo, BJ Protege, Beetle
Posts: 16,525
|
Not bad! Next time, you might consider using one of the unused warning lights in the cluster (like the ice light etc), and running the LED there. Means it's a little more fiddly if you ever remove the cluster, but it looks more integrated then. I did that with my alarm light a while back - now my rear fog light indicator flashes.
__________________
jdmparts.rupewrecht.com Sourcing your not-quite-overnight parts from Japan WRECHT--|--SLOWTEGE--|--BEETLE--|--SUBSTITUTE--|--AZ-1 |
|
|
|
|
10-12-2010, 06:48 PM
|
#72 |
|
Moderator
Join Date: Oct 2005
Location: Ipswich, Queensland
Car: 2002 Mazda Astina SP20 2006 Mazda 6 GY Wagon
Posts: 9,769
|
Hey Darryl,
Get off your butt already and install the Mazdaspeed Lip already, and if you wanna go for that JDP splitter look, I have just the answer! A ChargeSpeed lip off a WRX http://cgi.ebay.com.au/SUBARU-WRX-ST...#ht_3278wt_916 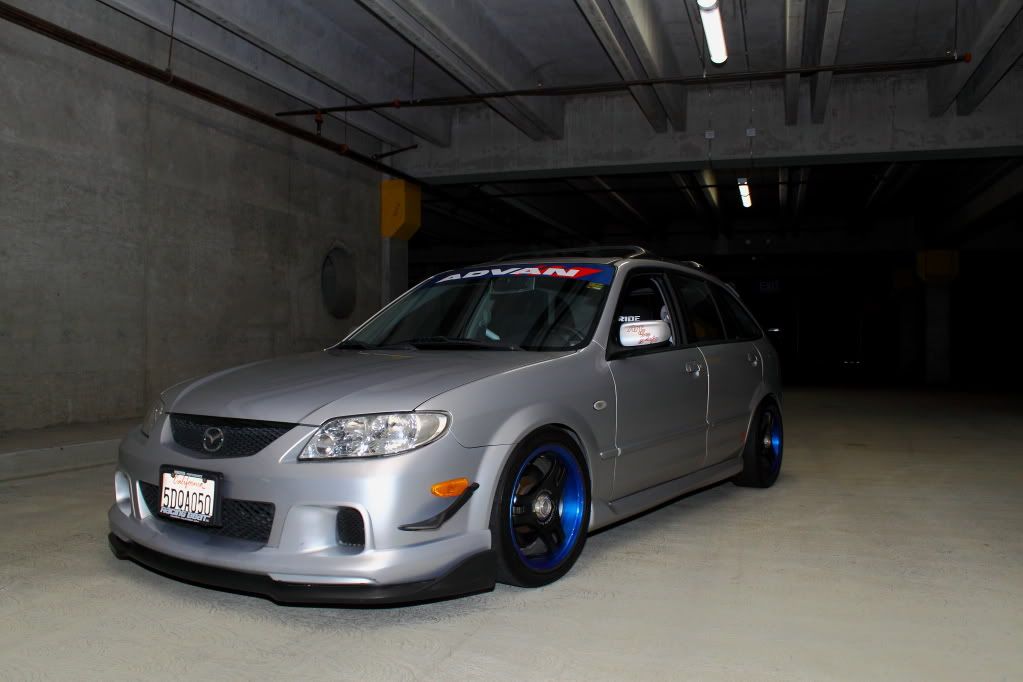 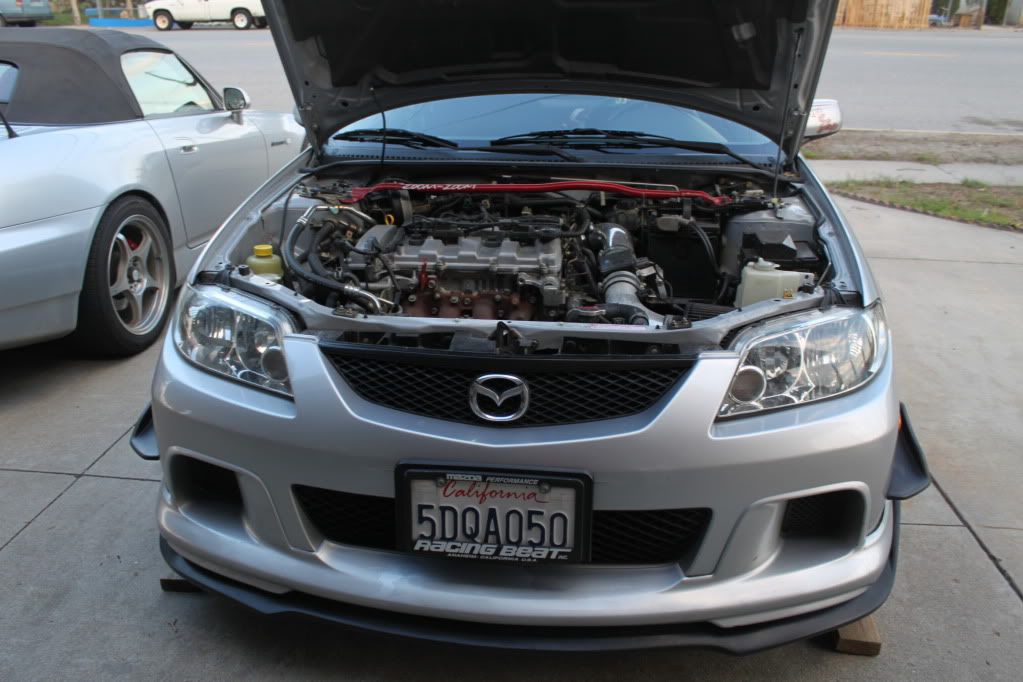 DO IT!!!!
__________________
|
|
|
|
|
10-12-2010, 11:15 PM
|
#73 |
|
SP20 Member!
|
!
Wow that matches up really well!
And its cheaper than getting the JDP lip over from the States. I have not had any word on the headlights from Matt V, so I might be pressing ahead with the lip install and other things just after Xmas. Will keep people informed. Not too long now
__________________
Exhaust: Autoexe headers; Custom midpipe; Racing Beat catback Engine: AWR mounts; Twiggy cams; Custom CAI; RR Racing UDP; Mishimoto rad EMS: Microtech LT-10; J&S Safeguard; Gearbox: MSP LSD; Fidanza flywheel; 5th gear Rims/Suspension: MX-5 rims; Tokico Illuminas; Eibach Pro-kit; Progress RSB; AutoExe STB Exterior: MSP front lip & rear spoiler; Matt V headlights; AutoExe grill; EDM tails Interior: JVC AVX-77; Autometer gauges; DaveBs; B&M shifter Projects to come: Engine rebuild |
|
|
|
|
20-12-2010, 03:29 PM
|
#74 |
|
SP20 Member!
|
Front-end upgrade nearly ready
So, I have pretty much gotten everything ready for the front-end upgrade I have been planning for a while now. Just a few minor things to sort out but all the difficult stuff is done.
I am planning to do the work in the week after New Years when I have some holiday time. I'm just hoping that the weather will be kind - will keep an eye out on the long-range forecasts. What I am planning to do: - remove stock scratched SP20 front bumper and foglights - make duct holes on the chasis behind the bumper to feed the intake - remove sick stock horn and install new aftermarket one - test fit and align new headlights (which I'm hoping will arrive before New Years) - remove power-steering trombone cooler and replace with new tube-fin cooler - install new painted SP20 front bumper (minus foglights) - install Mazdaspeed Protege front lip Look forward to a new look for the car!
__________________
Exhaust: Autoexe headers; Custom midpipe; Racing Beat catback Engine: AWR mounts; Twiggy cams; Custom CAI; RR Racing UDP; Mishimoto rad EMS: Microtech LT-10; J&S Safeguard; Gearbox: MSP LSD; Fidanza flywheel; 5th gear Rims/Suspension: MX-5 rims; Tokico Illuminas; Eibach Pro-kit; Progress RSB; AutoExe STB Exterior: MSP front lip & rear spoiler; Matt V headlights; AutoExe grill; EDM tails Interior: JVC AVX-77; Autometer gauges; DaveBs; B&M shifter Projects to come: Engine rebuild |
|
|
|
|
20-12-2010, 03:52 PM
|
#75 |
|
Senior Member

Join Date: Oct 2009
Location: Adelaide, Australia
Car: 07 Subaru Liberty GT Spec B tuned by STi
Posts: 912
|
All you need now are some of those racing hart rims and the 03.5 mazdaspeed rear skirt and you'll pretty much have a 03.5 Mazdaspeed protege
oh... and a turbo....
__________________
|
|
|
|
|
18-01-2011, 10:47 PM
|
#76 |
|
SP20 Member!
|
Nautilus horn installed
My stock horn has been sounding very sick for ages now and ages ago I bought a Nautilus horn a while back as a replacement. It has been sitting on my shelf waiting for me to get some time to change the front end.
I was originally intending to mount it in the front upper grill area but couldn't find a convenient mounting spot. I eventually found some space under the passenger headlight and used an old Mazda bracket I had lying around to mount it. I also used a relay to switch it on and off rather than just powering it through the stock horn wire. 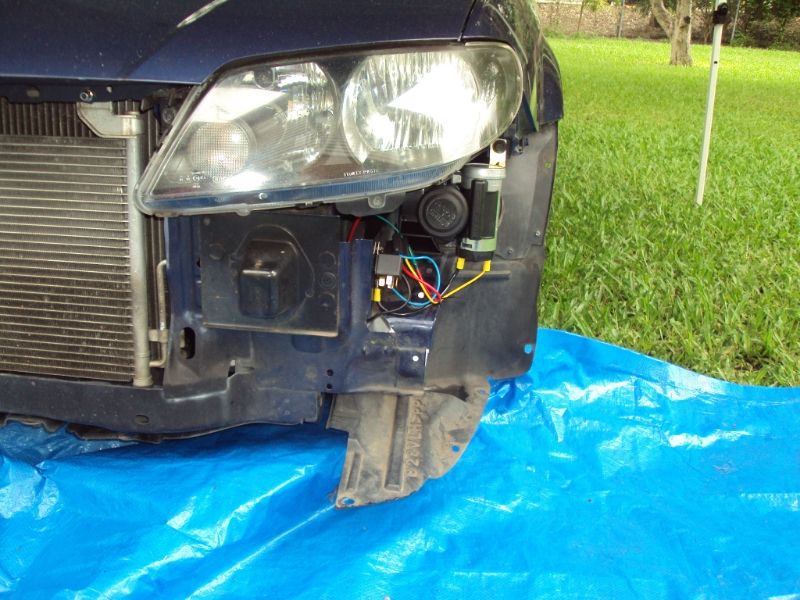 This horn is loud - 139 dB  I can't wait to give someone a blast with this!
__________________
Exhaust: Autoexe headers; Custom midpipe; Racing Beat catback Engine: AWR mounts; Twiggy cams; Custom CAI; RR Racing UDP; Mishimoto rad EMS: Microtech LT-10; J&S Safeguard; Gearbox: MSP LSD; Fidanza flywheel; 5th gear Rims/Suspension: MX-5 rims; Tokico Illuminas; Eibach Pro-kit; Progress RSB; AutoExe STB Exterior: MSP front lip & rear spoiler; Matt V headlights; AutoExe grill; EDM tails Interior: JVC AVX-77; Autometer gauges; DaveBs; B&M shifter Projects to come: Engine rebuild Last edited by Orion; 07-08-2014 at 04:52 PM. |
|
|
|
|
18-01-2011, 11:03 PM
|
#77 |
|
SP20 Member!
|
Power steering cooler installed
So for a while I have wanted to remove the "trombone" cooler from in front of the radiator. While I was biding my time, I painted the power steering reservoir an aluminium colour to match the various other similar colours in the engine bay (I think you see it in a later photo
") ). ).Installing the MSP front lip and having direct air flow behind the bumper gave me an excuse to install an small cooler in behind the bumper on the drivers side. 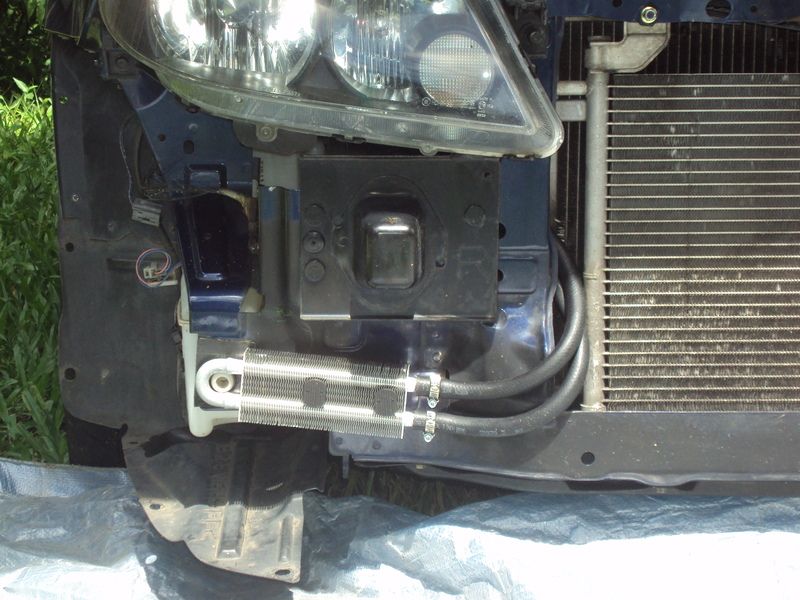 I had another "trombone" cooler that I cut up to provide a connection piece between the stock Mazda plumbing and the new cooler lines. Getting the new lines onto these pieces proved a bit of a nightmare  but we got there in the end. but we got there in the end.I have also drained the original power steering fuild and refilled with some lovely Motul Dextron III
__________________
Exhaust: Autoexe headers; Custom midpipe; Racing Beat catback Engine: AWR mounts; Twiggy cams; Custom CAI; RR Racing UDP; Mishimoto rad EMS: Microtech LT-10; J&S Safeguard; Gearbox: MSP LSD; Fidanza flywheel; 5th gear Rims/Suspension: MX-5 rims; Tokico Illuminas; Eibach Pro-kit; Progress RSB; AutoExe STB Exterior: MSP front lip & rear spoiler; Matt V headlights; AutoExe grill; EDM tails Interior: JVC AVX-77; Autometer gauges; DaveBs; B&M shifter Projects to come: Engine rebuild Last edited by Orion; 07-08-2014 at 04:54 PM. |
|
|
|
|
18-01-2011, 11:18 PM
|
#78 |
|
Senior Member

Join Date: Sep 2004
Location: n/a
Car: n/a
Posts: 10,929
|
That is cool. Get it? Cool?
I might just have to do that also. Where did you get the cooler from? |
|
|
|
|
18-01-2011, 11:26 PM
|
#79 |
|
SP20 Member!
|
Air intake ducting
Also on the theme of having cold air flow through the bumper, I wanted to provide better ducted air into the space where the air filter is. Trouble is that there is a bit of metal that sits in the way.
 So, a bit of work with a jigsaw (and some more work with a handsaw ) and the piece of metal disappears  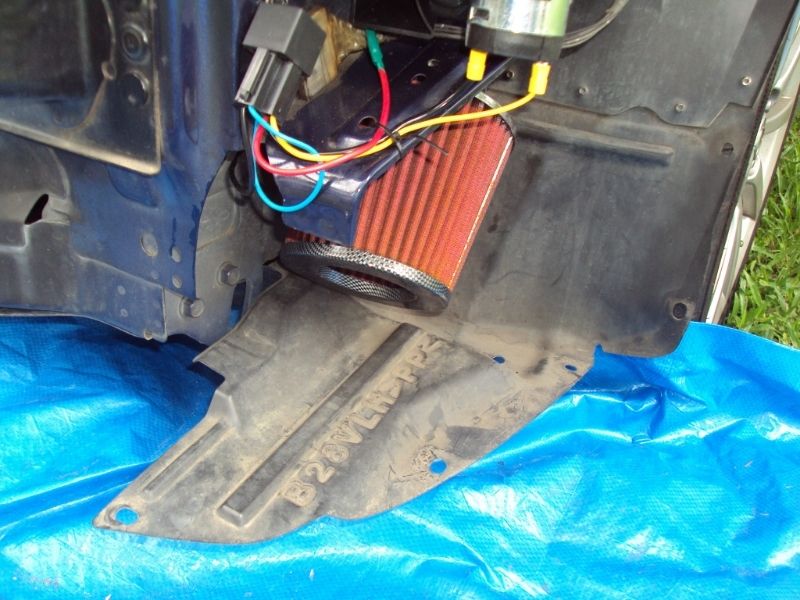 Now, I haven't been able to drive around much to see if it has had any effect, but I'm hoping that it will help lower the temperature of the air into the engine and find another pony or two
__________________
Exhaust: Autoexe headers; Custom midpipe; Racing Beat catback Engine: AWR mounts; Twiggy cams; Custom CAI; RR Racing UDP; Mishimoto rad EMS: Microtech LT-10; J&S Safeguard; Gearbox: MSP LSD; Fidanza flywheel; 5th gear Rims/Suspension: MX-5 rims; Tokico Illuminas; Eibach Pro-kit; Progress RSB; AutoExe STB Exterior: MSP front lip & rear spoiler; Matt V headlights; AutoExe grill; EDM tails Interior: JVC AVX-77; Autometer gauges; DaveBs; B&M shifter Projects to come: Engine rebuild Last edited by Orion; 07-08-2014 at 04:56 PM. |
|
|
|
|
19-01-2011, 12:51 AM
|
#80 |
|
SP20 Member!
|
Mazdaspeed Protege Lip
So now it is time for the coup de grais!
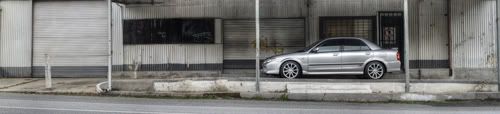
I organised with a local company here in Oz to source and ship a Mazdaspeed Protege Lip over from the United States in March 2010 (last year). It then took 6 months to arrive at my door due to various delays However, in the meantime I was able to get a new SP20 front bumper.Late last year, both of these items went off to spray painters to get done in the cars original colour. That was a mission in itself as I provide my old spoiler as a paint sample, but because it has sat in the dark for years, the shop could get an accurate match to the Mazda 22A paint code. I eventually had to take my car in for them to match it off the bumper. Steve did a pretty good job and I would recommend them to Brisbane locals: http://www.pjscustomspraypainting.com.au/ Without any further delay, here are the pics: New SP20 bumper on and lip in foreground: 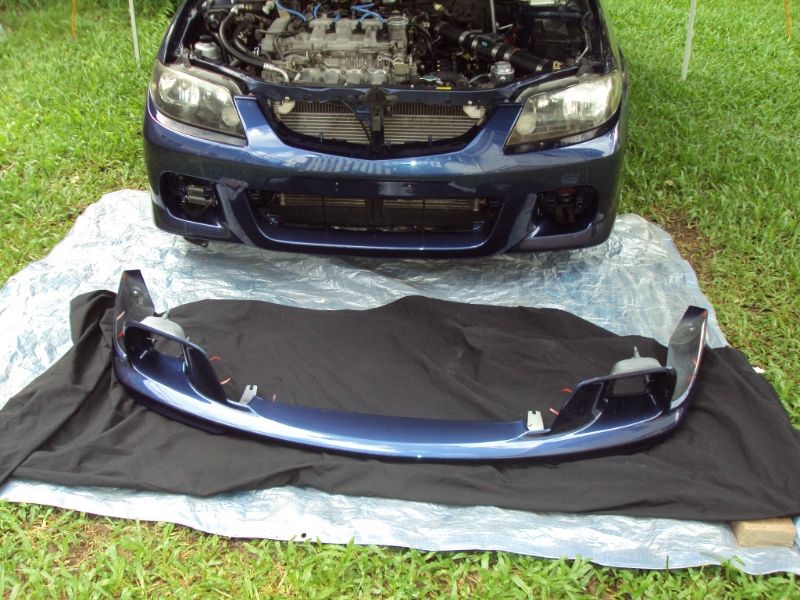 Lip fitted to bumper: 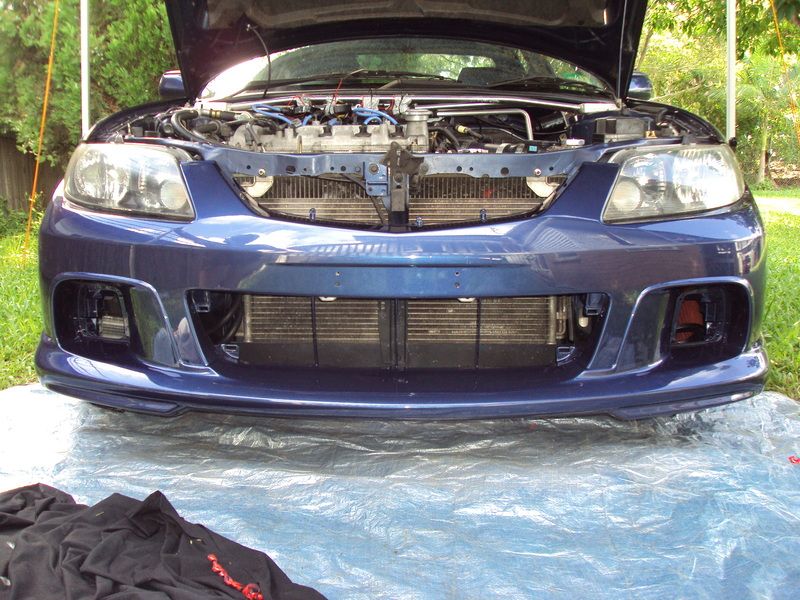 Here you can see the air filter through the grill: 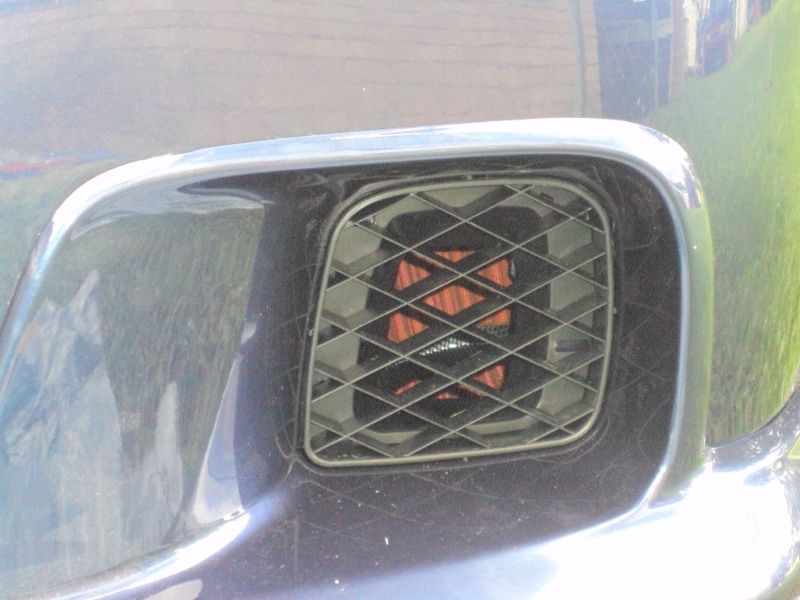 And here is the finished product! :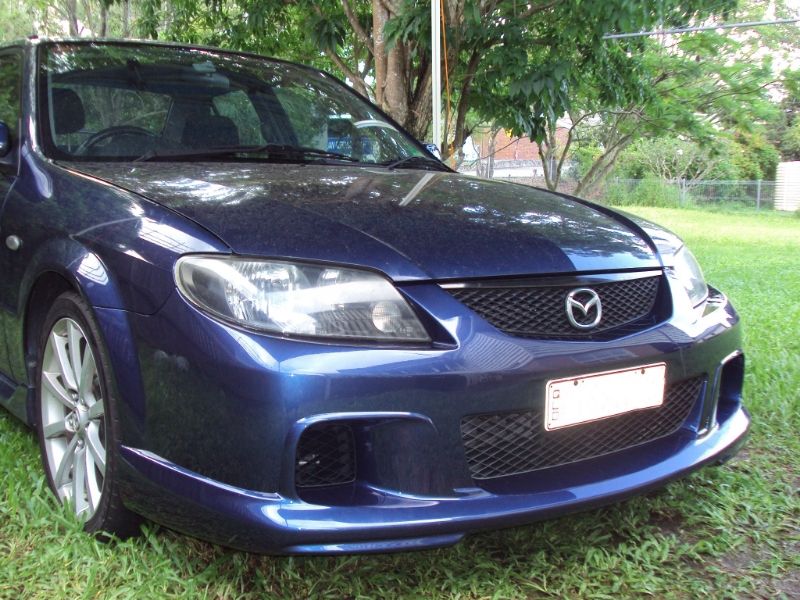
__________________
Exhaust: Autoexe headers; Custom midpipe; Racing Beat catback Engine: AWR mounts; Twiggy cams; Custom CAI; RR Racing UDP; Mishimoto rad EMS: Microtech LT-10; J&S Safeguard; Gearbox: MSP LSD; Fidanza flywheel; 5th gear Rims/Suspension: MX-5 rims; Tokico Illuminas; Eibach Pro-kit; Progress RSB; AutoExe STB Exterior: MSP front lip & rear spoiler; Matt V headlights; AutoExe grill; EDM tails Interior: JVC AVX-77; Autometer gauges; DaveBs; B&M shifter Projects to come: Engine rebuild Last edited by Orion; 10-08-2014 at 01:48 PM. |
|
|
|
 |
|
|


 Linear Mode

